
Choosing the right substrate for your Crested Gecko eggs is another essential factor in successful incubation. A suitable substrate will provide the necessary moisture and allow gas exchange for the developing embryo. Vermiculite and perlite mixtures are commonly used substrates for egg incubation due to their moisture retention properties. Ensure the substrate is damp, not wet, to prevent suffocation or drowning of the embryos.
Monitoring the incubation process is of utmost importance. Regularly check the temperature and humidity levels of the incubation chamber using a reliable thermometer and hygrometer. Keep the incubation container in a quiet and undisturbed area to minimize stress on the eggs. Be patient and resist the temptation to constantly handle or disturb the eggs, as this can interfere with the hatching process.
Choosing the Right Incubator
In addition to temperature control, humidity control is also a critical factor to consider. Crested gecko eggs require a specific level of humidity for proper incubation. The ideal humidity range for these eggs is between 70 to 80 percent. An incubator that includes a built-in humidity control system or allows for easy adjustments of humidity levels is highly recommended.
Types of Incubators
There are several types of incubators available for reptile egg incubation, including homemade and commercial options. Homemade incubators can be cost-effective, but they require close monitoring and adjustments to maintain temperature and humidity levels. Commercial incubators, on the other hand, are specifically designed for reptile egg incubation and often include advanced features such as digital temperature and humidity controls.
Additional Features to Consider
Several additional features can greatly enhance the incubation process and increase the chances of successful hatching. Some incubators come with automatic egg turners, which mimic the natural behavior of the parent geckos turning the eggs. This helps to ensure even development and prevents the embryos from sticking to the sides of the shells.
It is also recommended to choose an incubator that has good insulation and seals tightly to prevent any temperature or humidity fluctuations. Additionally, having a clear viewing window allows for easy monitoring of the eggs without disrupting the incubation process.
| Choosing the Right Incubator | |
|---|---|
| Factors to consider |
|
Setting Up the Incubator
1. Choose the Right Incubator
Before setting up the incubator, you need to choose the right one for your needs. There are various types of incubators available, including homemade DIY options and commercially available ones. Consider factors such as size, temperature and humidity control, and ease of use when selecting an incubator.
2. Select the Proper Substrate
The substrate you choose for your incubator plays a significant role in maintaining the correct humidity level. It is advisable to use a moisture-retentive substrate, such as vermiculite or perlite, mixed with water. This substrate will provide the necessary moisture for the eggs without causing them to become too wet.
3. Create a Stable Temperature Environment
Temperature control is crucial during the incubation process. It is recommended to set the temperature between 78-82 degrees Fahrenheit (25-28 degrees Celsius), as this range closely resembles the temperature at which crest gecko eggs naturally develop. Use a digital thermometer to monitor and maintain the temperature inside the incubator.
4. Maintain Optimal Humidity Levels
Humidity is another critical factor in crested gecko egg incubation. The ideal humidity level for the incubator should be around 70%-80%. This level can be achieved by adding water to the substrate and monitoring the humidity using a hygrometer. To maintain consistent humidity, mist the inside of the incubator regularly and keep the lid closed as much as possible.
5. Provide Proper Ventilation
While it is essential to maintain humidity levels, it is equally important to provide proper ventilation to prevent the growth of mold and fungi. Make sure your incubator has small ventilation holes or vents to allow fresh air circulation. These holes should be small enough to prevent the escape of excessive humidity.
By following these steps, you can set up an incubator that provides the optimal conditions for crested gecko egg incubation. Remember to monitor the temperature and humidity levels regularly and make any necessary adjustments. Properly setting up the incubator is the foundation for a successful hatchling.
Temperature and Humidity Control
Temperature and humidity control are crucial factors in the successful incubation of crested gecko eggs. Maintaining the right conditions will help ensure healthy development and hatching of the eggs.
1. Temperature Control
To achieve this, it is recommended to use a reliable thermostat or temperature controller. This device will help regulate the temperature within the incubator and prevent any drastic fluctuations that could negatively impact the developing embryos.
2. Humidity Control

Humidity levels are equally important and should be carefully monitored during the incubation process. The optimal humidity range for crested gecko eggs falls between 70% to 80%.
A hygrometer should be used to measure the humidity levels inside the incubator. If the humidity levels are too low, you can increase it by spraying the incubation substrate with water or by using a humidifier. Conversely, if the humidity is too high, you can allow for more ventilation or reduce the amount of water sprayed.
By closely monitoring and controlling both temperature and humidity, you can create an optimal environment for the developing eggs and increase the chances of successful hatchings. Regularly check the temperature and humidity levels, making any necessary adjustments to maintain the optimal conditions for the incubation of crested gecko eggs.
Egg Collection and Preparation
1. Collecting the Eggs: Check the incubation container regularly for newly laid eggs. Gently remove the eggs from the substrate to prevent damage. Be careful not to rotate or shake the eggs, as this can disturb the developing embryos.
2. Cleaning the Eggs: Inspect the eggs for any dirt or debris. Use a soft, damp cloth to gently clean the eggs if needed. Avoid using any harsh chemicals or substances that could harm the eggs.
4. Preparing the Incubation Container: Choose a suitable incubation container that provides enough space for the eggs and allows proper airflow. Fill the container with a suitable incubation substrate, such as vermiculite or perlite, to create a humid environment for the eggs.
6. Maintaining Temperature and Humidity: Place the incubation container in a temperature-controlled environment with a stable temperature between 72-78°F (22-25°C). Use a reliable thermometer and hygrometer to monitor the temperature and humidity levels inside the container. Aim for a humidity level of around 75-80%.
7. Regular Egg Inspection: Throughout the incubation period, regularly inspect the eggs for any signs of mold, fungal growth, or physical changes. Remove any moldy or damaged eggs to prevent the spread of infection to healthy eggs.
8. Documenting the Incubation Process: Keep a record of important information such as egg collection dates, incubation temperature, humidity levels, and any observations or changes during the incubation period. This documentation will help you track the progress and make adjustments if needed.
By following these steps and providing the optimal conditions for incubation, you can increase the chances of a successful hatch and ensure the healthy development of crested gecko hatchlings. Remember to handle the eggs with care and be patient throughout the incubation process.
The Importance of Proper Egg Positioning in Crested Gecko Egg Incubation
Proper egg positioning is crucial in the incubation process of crested gecko eggs. It plays a significant role in ensuring the successful development and hatching of the eggs. When eggs are not positioned correctly, it can lead to complications and potential loss of hatchlings.
The incubation medium’s substrate also plays a role in proper egg positioning. The substrate should be soft and supportive enough to hold the eggs in their placed orientation without causing harm. It is recommended to use a substrate specifically designed for reptile egg incubation to provide the best possible conditions for the eggs.
Another aspect to consider is the humidity level within the incubation environment. The eggs require a specific level of humidity to develop correctly. If the humidity is too low, the eggs may dehydrate, leading to loss of moisture and potential embryo death. On the other hand, excessive humidity can lead to fungal and bacterial growth, which can be harmful to the eggs.
Regular monitoring of the eggs is vital to ensure their proper positioning and resolve any issues promptly. It is recommended to check the eggs regularly to see if they have shifted or become dislodged from their original position. If any eggs need repositioning, it should be done carefully and gently to avoid damaging the embryo inside.
Creating the Ideal Incubation Medium
Creating the ideal incubation medium is crucial for the successful incubation of crested gecko eggs. The incubation medium should provide a suitable environment for the eggs to develop and hatch, ensuring the health and well-being of the hatchlings.
One of the most important factors to consider when creating the incubation medium is the humidity level. Crested gecko eggs require a high humidity level to properly develop. The humidity level should be around 80% to 90% throughout the incubation process. This can be achieved by using a suitable substrate and maintaining proper ventilation.
To create the incubation medium, mix the chosen substrate with water until it reaches the desired consistency. The substrate should feel slightly moist, but not wet or soggy. It should be able to hold its shape when compressed, but not release excess water.
Setting Up the Incubator
Once the incubation medium is prepared, it should be placed in a suitable container within the incubator. The container should have a lid to prevent moisture loss and maintain a stable humidity level. It should also have small ventilation holes to allow for airflow and prevent the buildup of mold or fungus.
The container should be cleaned thoroughly before use to remove any bacteria or contaminants. It is also important to monitor the temperature and humidity levels inside the incubator regularly to ensure they remain stable and within the recommended range.
Managing the Incubation Process
By creating the ideal incubation medium and properly managing the incubation process, you can increase the chances of a successful hatch and ensure the health and well-being of the crested gecko hatchlings.
Managing the Incubation Process
1. Set up the Incubator
Before you start incubating crested gecko eggs, you need to set up a proper incubator. Choose an incubator that allows you to control the temperature and humidity levels accurately. Place a layer of substrate at the bottom of the incubator to provide a stable environment for the eggs.
2. Monitor the Temperature
Temperature plays a critical role in the incubation process. Aim for a temperature of around 82-84°F (28-29°C) for optimal hatchling development. Use a reliable thermometer to monitor the temperature inside the incubator regularly. Make sure to adjust the temperature settings accordingly if needed.
3. Control the Humidity
Humidity is another important factor in crested gecko egg incubation. Maintain a humidity level of around 70-80% to prevent the eggs from drying out. Use a hygrometer to monitor the humidity levels and adjust accordingly by misting the substrate or adding water if needed.
4. Rotate the Eggs
Regularly rotating the eggs is crucial to prevent the embryos from sticking to the eggshell membrane. Gently roll the eggs around once or twice a day to ensure even development and proper positioning of the hatchling inside the egg.
5. Avoid Disturbances
During the incubation process, it’s essential to minimize disturbances to the eggs. Avoid moving or shaking the incubator unnecessarily, as it can disturb the developing embryos. Keep the incubator in a quiet and stable environment to promote successful hatching.
6. Document the Incubation Process
It’s a good idea to document the incubation process by keeping a record of important details such as temperature and humidity levels, egg collection dates, and any observations you make along the way. This can help you identify patterns and troubleshoot any issues that may arise.
By effectively managing the incubation process, you can increase the chances of successfully hatching healthy crested gecko hatchlings. Remember to closely monitor the temperature and humidity levels, rotate the eggs regularly, avoid disturbances, and keep detailed records. With proper care and attention, you’ll be rewarded with adorable hatchlings in no time!
Monitoring the Eggs
During the incubation period, it is crucial to regularly monitor the eggs to ensure their proper development. Monitoring the eggs involves checking their condition, temperature, and humidity levels.
Similarly, humidity plays a significant role in the incubation process. The relative humidity should be kept around 70-80%, as this allows for proper moisture absorption through the eggshell. Too low humidity can result in dehydration and developmental issues, while excessive humidity can lead to fungal growth and suffocation of the embryos. Regularly check and adjust the humidity levels as needed using a mister or by adding the appropriate amount of water to the incubation medium.
When monitoring the eggs, it is also important to keep a record of their progress. Note down the date of egg collection, the condition of each egg, and any pertinent observations. This record will help you track the incubation period and identify any abnormalities or deviations from the expected development. Taking photographs of the eggs at various stages can also provide valuable documentation.
Troubleshooting Common Incubation Issues
Temperature Fluctuations
One common problem during incubation is temperature fluctuations. It’s crucial to maintain a stable temperature throughout the entire incubation period. A temperature range of 72-78°F (22-25°C) is optimal for crested gecko eggs. Too high or too low temperatures can negatively impact the development of the embryos.
Humidity Imbalances
Another issue that may occur is humidity imbalances. Crested gecko eggs require a specific level of humidity for proper development. The ideal humidity range is between 80-90%. If the humidity is too low, it can cause the eggs to dry out and become non-viable. On the other hand, excessive humidity can lead to mold growth, which can be detrimental to the eggs.
Contamination and Mold Growth
Contamination and mold growth can also be a common issue during crested gecko egg incubation. Mold can develop if the humidity levels are too high or if the incubation medium is not properly sterilized. Mold growth can be harmful to the developing embryos and may lead to their death.
To prevent mold growth, it’s essential to use a clean and sterile incubation medium. This can be achieved by baking or microwaving the substrate before use. Additionally, monitoring the humidity levels and regularly inspecting the eggs for any signs of mold can help to address the issue early on.
Delayed or Failed Hatchings
Delayed or failed hatchings can be a cause for concern during crested gecko egg incubation. There can be several reasons for this, including improper temperature or humidity levels, genetic abnormalities, or infertile eggs.
If the eggs fail to hatch within the expected timeframe, it may be necessary to adjust the temperature or humidity settings in the incubator. Consulting with experienced reptile breeders or veterinarians can also provide valuable guidance and advice in troubleshooting these issues.
Troubleshooting common incubation issues is crucial for the successful hatching of crested gecko eggs. Maintaining stable temperature and humidity levels, preventing mold growth, and addressing any delays or abnormalities promptly can greatly increase the chances of a successful incubation process and the healthy development of the hatchlings.
Managing Mold and Fungal Growth during Incubation
To prevent mold and fungal growth during incubation, it is essential to maintain proper hygiene and cleanliness in the incubator and the eggs themselves. Here are some strategies to effectively manage mold and fungal growth:
1. Clean and Sterilize:
Before starting the incubation process, make sure to thoroughly clean and sterilize the incubator and all the equipment you will be using. This includes wiping down the interior of the incubator with a mild disinfectant solution and rinsing it thoroughly. Clean any tools used for handling the eggs as well.
2. Use a Clean Substrate:
Choose a sterile and mold-resistant substrate for the eggs. Avoid using materials that are prone to mold growth, such as sphagnum moss. Instead, opt for a commercial reptile egg incubation medium that is specially formulated to resist mold and provide adequate moisture for the eggs.
3. Proper Ventilation:
Ensure that the incubator has proper ventilation to prevent the buildup of excess moisture, which can contribute to mold growth. Consider using an incubator with adjustable vents or use a small fan to circulate the air inside the incubator.
4. Monitor Humidity Levels:
5. Remove Moldy Eggs:
If you notice any eggs showing signs of mold or fungal growth, it’s crucial to remove them immediately. These eggs are unlikely to hatch and can pose a threat to the other healthy eggs. Dispose of them properly and sanitize any tools used to handle them.
By following these strategies, you can effectively manage mold and fungal growth during incubation and increase the chances of successfully hatching healthy crested gecko hatchlings.
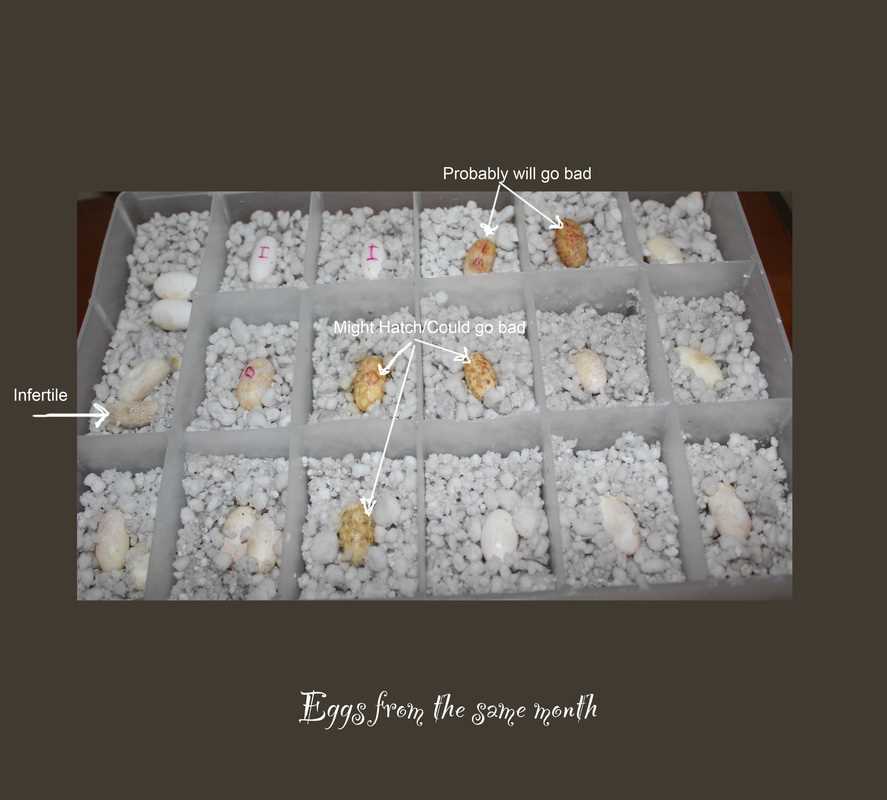
Dealing with Infertile Eggs
Identifying Infertile Eggs
Removing Infertile Eggs
Once an infertile egg has been identified, it should be carefully removed from the incubator. Use clean, sterile tweezers or forceps to gently grasp the egg and lift it out of the incubation medium. Take care not to drop or damage the egg during the removal process.
Disposing of Infertile Eggs
Reassessing Incubation Conditions
By promptly identifying and removing infertile eggs from the incubator, you can optimize the incubation process for healthy and viable crested gecko hatchlings. Regular monitoring, proper disposal, and maintaining optimal incubation conditions are key components of successful crested gecko egg incubation.
Caring for Developing Embryos
Proper care and attention are essential during the incubation period to ensure the successful development of crested gecko eggs. Here are some key factors to consider:
- Temperature: Maintaining a consistent temperature is crucial for the healthy development of gecko embryos. The optimal temperature for incubating crested gecko eggs is around 80 to 84 degrees Fahrenheit (26 to 29 degrees Celsius). Fluctuations in temperature can lead to developmental issues or even death of the embryos. Use a reliable thermometer to monitor the temperature inside the incubator regularly.
- Humidity: Adequate humidity levels are also vital for the development of gecko embryos. Aim for a humidity level of around 70% to 80% throughout the incubation period. This helps prevent the eggs from drying out and promotes the formation of healthy hatchlings. Use a hygrometer to measure and maintain the humidity levels accurately.
- Substrate: Choose an appropriate substrate for the incubation process. Many breeders prefer using a substrate like vermiculite or perlite mixed with water to create a damp but not overly wet environment. The substrate should provide enough moisture and support for the developing eggs. Make sure to research and select a substrate that is safe and suitable for crested gecko eggs.
- Egg Turning: To simulate natural conditions, it is essential to turn the eggs regularly. Gently rotate the eggs a few times a day to prevent the embryos from sticking to the shell and to ensure proper development. Use a marker to indicate the “top” of each egg to keep track of the rotation.
- Incubation Period: Crested gecko eggs typically hatch within 60 to 90 days, but the exact time can vary. Record the date when the eggs were laid and monitor their progress. Avoid handling the eggs excessively during this period to prevent damage or contamination.
- Monitor Development: Check the eggs regularly for any signs of mold or fungal growth. Remove any contaminated eggs immediately to prevent the spread of infection to healthy ones. A healthy developing embryo should show clear veins and steady growth. If any abnormalities or issues arise, consult a reptile veterinarian or experienced breeder for guidance.
Following these guidelines can significantly increase the chances of a successful crested gecko egg incubation and the healthy development of hatchlings. Remember to always do thorough research, consult experienced breeders, and seek professional advice when necessary. With proper care and attention, you can enjoy the rewarding experience of breeding and raising crested geckos.
The Complete Guide to Crested Gecko Egg Incubation: Hatching Time and Hatchling Care
Setting Up the Incubator
Choosing the right incubator is essential for maintaining a consistent temperature and humidity throughout the incubation process. A reliable and accurate digital thermometer and hygrometer should be used to monitor the conditions within the incubator.
Managing the Incubation Process
Creating the ideal incubation medium is also important for the proper development of the embryos. A common method is to use a mixture of vermiculite or perlite and water, creating a substrate with the consistency of damp sand. The eggs should be buried halfway into the substrate with the round end facing up.
Monitoring the humidity levels is crucial, as too much humidity can lead to mold and fungal growth, while too little can cause the eggs to dehydrate. Regular misting or using a damp sponge in the incubator can help maintain the desired humidity.
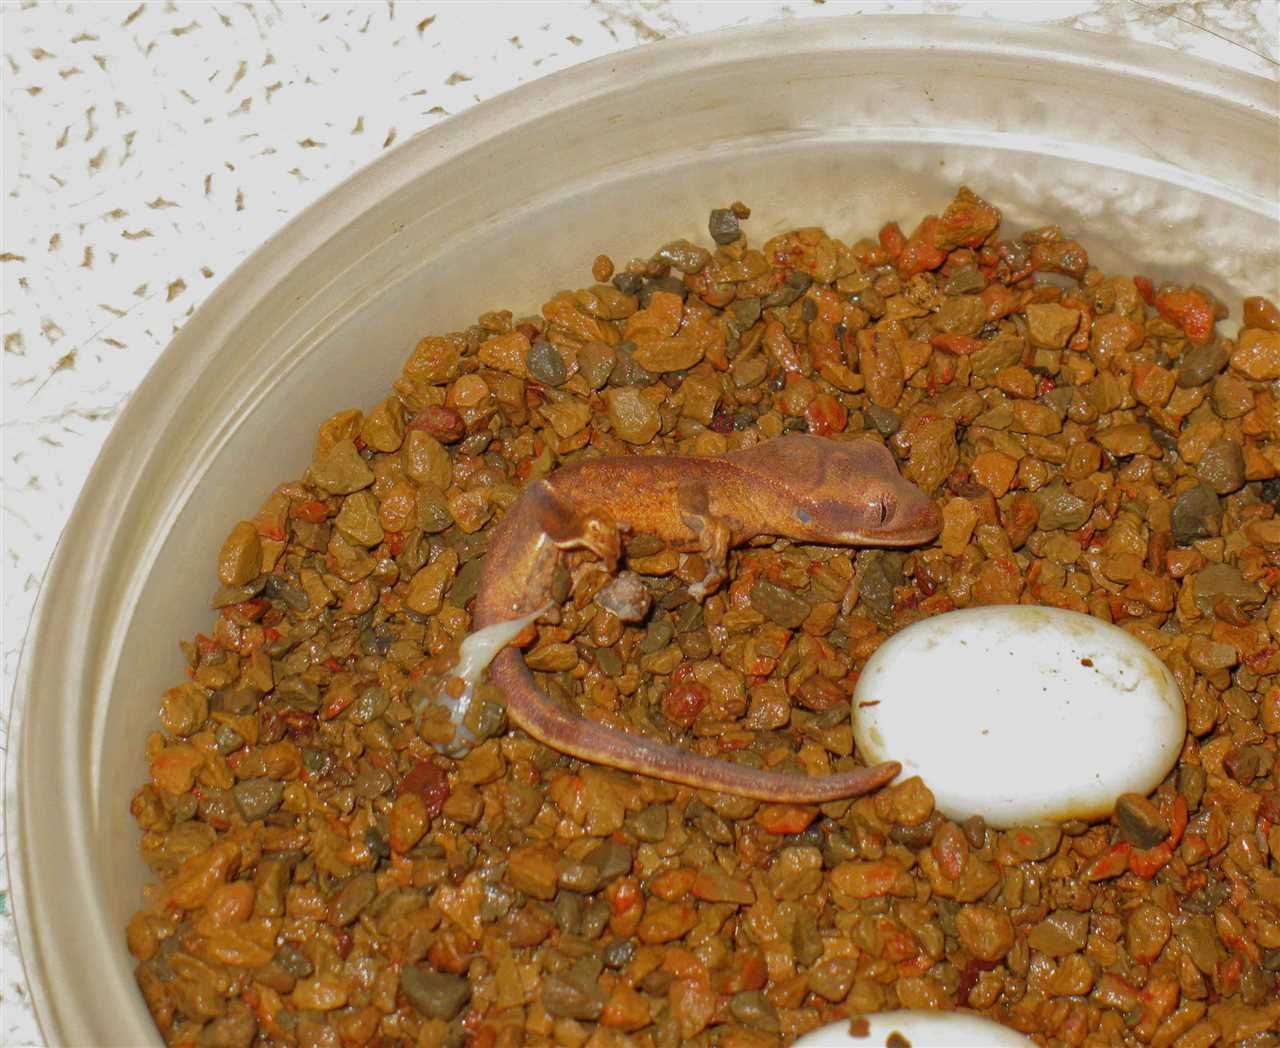
Hatching Time and Hatchling Care
Once the hatchlings emerge from their eggs, they should be left in the incubator for 24-48 hours to fully absorb their yolk sacs. After this time, they can be gently transferred to a separate enclosure with appropriate temperature and humidity levels. Providing small, live prey such as fruit flies or pinhead crickets is essential for their proper growth and development.
Documenting the Incubation process
Keeping detailed records of the incubation process, including dates, temperatures, and any observations, can be invaluable for future breeding attempts. This documentation can help identify patterns and improve the success rate of hatching in future breeding seasons.
| Incubation Tips |
|---|
| Regularly monitor temperature and humidity levels |
| Remove any moldy or discolored eggs |
| Create an incubation medium with the consistency of damp sand |
| Maintain proper humidity levels through misting or a damp sponge |
| Transfer hatchlings to a separate enclosure after they have absorbed their yolk sacs |
| Provide small, live prey for proper growth and development of hatchlings |
By following these guidelines and taking proper care during the incubation and hatching process, reptile enthusiasts can experience the joy of successfully breeding and raising healthy crested geckos.
Caring for Hatchlings of Crested Gecko: Feeding, Temperature, and Humidity
Once your crested gecko eggs have successfully hatched, you will need to provide proper care for the hatchlings to ensure their health and well-being. Here are some important factors to consider:
1. Feeding:
2. Temperature:
Keep the hatchlings in a warm environment with a temperature range of 75°F to 80°F (24°C to 27°C). Use a reptile heat mat or an overhead heating source to maintain a consistent and appropriate temperature. Monitoring the temperature regularly is crucial to ensure hatchlings thrive in the optimal conditions.
3. Humidity:
Humidity plays a significant role in the development and health of crested gecko hatchlings. Aim for a humidity level of around 70% to 80%. You can achieve this by misting the enclosure or providing a humid hideout. It is essential to monitor and adjust humidity levels as necessary to prevent excessive moisture or dryness.
4. Substrate:
5. Enclosure Setup:
Provide a small and secure enclosure for the hatchlings, preferably in a well-ventilated container or a smaller reptile terrarium. Include appropriate hiding spots, such as small branches or artificial plants, to reduce stress and promote a sense of security for the hatchlings.
6. Monitoring:
Regularly monitor the hatchlings’ behavior, appetite, and overall health. Check for any signs of illness, such as weight loss, lethargy, or unusual behaviors. Promptly address any concerns and seek veterinary assistance if needed.
By following these guidelines, you can ensure the proper care and development of your crested gecko hatchlings. Remember to provide them with a suitable diet, maintain the appropriate temperature and humidity levels, and regularly monitor their well-being. With proper care, your hatchlings will grow into healthy adult crested geckos.
The First Feedings
In addition to live insects, it is also recommended to offer a small amount of soft fruit puree to the hatchlings. This can be provided by placing a small amount of fruit puree on a shallow dish or by smearing it on a piece of bark or other textured surface within the enclosure. The hatchlings will learn to lick the fruit puree, which provides additional hydration and nutrients.

I’m Lena Adams—a product of an unconventional upbringing in the African wilderness. My father, a daring explorer of African wildlife, sparked my fascination with reptiles, a passion that intertwined with the tragic loss of my mother during an expedition, leaving an indelible mark on my life. Driven to understand the creatures that captivated my parents, I embarked on my journey, sharing insights about reptiles, frogs, and lizards on my website. Through my explorations and conservation efforts, I honour my family’s legacy while seeking connections—to the creatures, nature, and the mother whose presence I yearn to understand.