
If you have ever wondered how to draw a tree frog, then you have come to the right place! Drawing a tree frog may seem daunting at first, but with a few simple steps, you will be able to create your own masterpiece. Whether you are a beginner or an experienced artist, this tutorial will guide you through the process of drawing a tree frog.
The first step in learning how to draw a tree frog is to gather your materials. You will need a pencil, eraser, and paper. It is also helpful to have a reference photo of a tree frog to guide you. Once you have all your materials ready, you can begin your drawing.
Easy Steps to Draw a Tree Frog
If you have ever wondered how to draw a tree frog, you have come to the right place. Drawing a tree frog may seem challenging at first, but with these easy steps, you will be able to capture the essence of this fascinating creature in no time.
Gather Your Supplies
Before you start drawing, gather all the necessary supplies. You will need a piece of paper, a pencil, an eraser, and some colored pencils or markers if you want to add a touch of color to your drawing.
Start with Basic Shapes
The first step in drawing a tree frog is to outline its body using basic shapes. Start by drawing an oval shape for the body and a smaller oval shape for the head. Connect them with a curved line to create the neck.
Next, draw two circles for the eyes, a small triangle for the nose, and a curved line for the mouth. Finally, add two curved lines for the limbs.
- Start with an oval for the body
- Add a smaller oval for the head
- Connect them with a curved line
- Draw two circles for the eyes
- Add a small triangle for the nose
- Draw a curved line for the mouth
- Finally, add two curved lines for the limbs
Add Detail to the Body
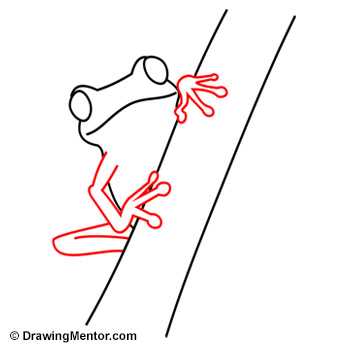
Once you have the basic shapes in place, it’s time to add some details to the body. Start by drawing the webbed fingers and toes on the limbs. You can also add some texture by drawing small bumps on the frog’s skin.
Draw the Legs and Feet
The next step is to draw the legs and feet of the tree frog. Start by drawing the front legs, making them slightly shorter than the hind legs. Add the details of the feet, including the fingers and the toes.
Make sure to draw the toes with small curved lines to represent the webbing. This will give your tree frog a realistic look.
Create the Eyes and Mouth
For the mouth, draw a wide smile-like shape, with small bumps on the upper lip and a curved line for the lower lip. You can also add a small line on each side of the mouth to represent the frog’s cheeks.
Finish with Textures and Shadows
Pay attention to the light source and add shadows accordingly. This will make your tree frog more three-dimensional and lifelike.
With these easy steps, you can learn how to draw a tree frog and create a beautiful piece of artwork. Practice and experiment with different techniques to develop your own style and make your drawing truly unique.
Gather Your Supplies
Before you start learning how to draw a tree frog, make sure you have all the necessary supplies. Here’s a list of what you’ll need:
Paper
- Choose a sturdy paper that can handle drawing and erasing.
- Preferably, use a high-quality drawing paper or sketchbook.
Drawing Tools
- Pencils: You’ll need a range of graphite pencils, including HB, 2B, and 4B for shading and adding depth.
- Eraser: A good quality eraser, preferably a kneaded eraser, is essential for corrections and highlights.
- Sharpener: Keep a pencil sharpener nearby to maintain a sharp point for precise details.
- Blending Stump or Tortillion: These tools help in smudging and blending graphite for smooth transitions.
References
Having visual references of tree frogs is crucial for capturing their unique characteristics and anatomy accurately. You can find reference images in books or online sources that specialize in wildlife or nature photography.
Work Space
Set up a comfortable and well-lit work area. Make sure you have enough space for your paper and drawing supplies. Good lighting conditions will help you see details clearly and prevent straining your eyes.
Once you have gathered all the necessary supplies, you’ll be ready to embark on your tree frog drawing journey. Remember to take your time, stay patient, and have fun with the process! Happy drawing!
Start with Basic Shapes
Next, draw two curved lines extending from the head to define the frog’s back. These lines should curve downwards and slightly towards the back of the body.
Then, draw two smaller ovals on each side of the body to represent the forelimbs. These ovals should be slightly larger at the top and taper towards the bottom.
For the hind legs, draw two elongated triangles that extend from the bottom of the body. These triangles should be slightly curved and point downwards.
Now that you have the basic shapes in place, you can start refining the outline of the tree frog’s body. Use smooth curves to connect the shapes and create a more realistic and organic form.
Remember to keep the proportions in mind as you draw. The body should be slightly wider towards the back, and the hind legs should be longer and more muscular than the forelimbs.
Once you are satisfied with the overall shape of the frog, you can move on to adding details and textures to bring your drawing to life.
How to Add Detail to the Body of a Tree Frog
Adding detail to the body of a tree frog is an important step in creating a realistic drawing. By paying attention to the texture and shape of the skin, you can bring your drawing to life. Follow these steps to add detail to the body of a tree frog:
Step 1: Observe the Frog’s Skin
Take a close look at reference images of tree frogs to understand the patterns and textures present on their skin. Notice how the skin has small bumps and ridges that vary in size and arrangement. This observation will help you add realistic details to your drawing.
Step 2: Start with the Outline
Using a pencil, lightly outline the shape of the frog’s body. Focus on capturing the overall form and proportions. Don’t worry about adding too much detail at this stage.
Step 3: Add Texture with Lines
To create the texture of the frog’s skin, use short, curved lines to represent the bumps and ridges. Vary the length and direction of the lines to make the skin look more organic. Pay attention to the reference images and replicate the patterns you see.
Pro tip: Use a light touch and build up the texture gradually. Start with lighter lines and gradually darken them as you add more detail.
Step 4: Focus on the Head and Back
The head and back of a tree frog often have distinctive patterns and texture. Pay extra attention to these areas and add more detail to make them stand out. Use small, curved lines to represent the texture on the frog’s head, and emphasize any markings or spots that are present.
Step 5: Shade and Blend
To give your drawing more depth and dimension, use shading techniques. Use a darker pencil or shade with your current pencil to add shadows around the frog’s body and in areas where there is less light. Use a blending tool or your finger to blend the shading and create a smooth transition between the lighter and darker areas.
With these steps, you can add realistic detail to the body of a tree frog. Practice observing and replicating the texture and patterns, and soon you’ll create drawings that capture the beauty of these fascinating creatures.
How to Draw a Tree Frog
If you want to learn how to draw a tree frog, follow these easy steps. Drawing a tree frog may seem daunting at first, but with a little practice, you can create a realistic and detailed representation of this fascinating creature.
Gather Your Supplies
Before you start, make sure you have all the necessary supplies. You will need a blank piece of paper, a pencil, an eraser, and colored pencils or markers if you want to add color to your drawing.
Start with Basic Shapes
Begin your drawing by sketching out the basic shapes of the tree frog. Start with an oval shape for the body and a smaller oval for the head. Draw two lines extending from the head for the legs and two lines for the arms.
Pro tip: Use light pencil marks for this step, as you will be erasing them later.
Add Detail to the Body
Next, add more detail to the body of the frog. Add curves to define the shape of the body and limbs. Draw small bumps along the frog’s back to represent its bumpy texture.
Create the Eyes and Mouth
Once you have the basic body shape, draw the frog’s eyes and mouth. Tree frogs have large bulging eyes, so make sure to draw them accordingly. Add a small, curved line for the mouth.
Draw the Legs and Feet
Now, focus on drawing the legs and feet of the tree frog. Use curved lines to create the shape of the frog’s legs and add webbed feet with small toes at the end. Pay attention to the position and proportion of the legs to make your drawing more realistic.
Pro tip: Look at reference images of tree frogs to help you get the proportions and details right.
Finish with Textures and Shadows
Finally, add textures and shadows to your drawing to give it depth and realism. Use small, overlapping curved lines to create the frog’s bumpy skin texture. Shade areas where light doesn’t reach to add dimension to your drawing.
With patience and practice, you can create a beautiful drawing of a tree frog. Remember to have fun and experiment with different techniques to make your drawing unique!
How to Draw a Frog: Creating the Eyes and Mouth
Once you have drawn the basic shape of the tree frog and added details to its body, it’s time to focus on creating the eyes and mouth. These features are crucial in capturing the unique character of the frog.
To start, draw two small almond shapes on the upper part of the frog’s head for the eyes. Make sure they are slightly tilted towards each other, giving the frog a curious and lively expression.
Within each eye, draw a smaller circle to represent the iris. Shade the iris, leaving a small white highlight to add a spark of life to the eyes.
Next, draw a slightly curved line below the eyes to form the frog’s mouth. Give it a gentle smile by curving the ends of the line slightly upwards. Inside the mouth, draw a smaller curve to represent the tongue peeking out.
To add depth and dimension to the eyes, create a shaded area below the top eyelid using short, curved lines. This will give the illusion of shadow and make the eyes appear more realistic.
To finish the eyes, draw a few small dots above the eyes to represent reflections of light. Place them strategically to make the eyes appear glossy and vibrant.
Remember to keep your lines light and sketchy until you are satisfied with the placement and shape of the eyes and mouth. Once you are confident, darken the lines and erase any unnecessary guidelines.
By now, your tree frog drawing should start to take shape, with its unique eyes and mouth reflecting its lively nature. Next, you can move on to the final step: adding textures and shadows to bring your drawing to life.
Finish with Textures and Shadows
Another technique you can use is cross-hatching, which involves layering sets of hatching lines over each other at different angles. This technique can create a more 3D effect and add depth to your drawing. Experiment with different angles and densities of cross-hatching to see what works best for your tree frog drawing.
When applying textures, pay attention to the specific patterns and markings on a tree frog’s skin. These can include spots, stripes, or mottled patterns. Use your pencil to carefully recreate these patterns, taking care to match the shape and size of the reference photo.
Shadows are also important for adding depth to your drawing. Observe the lighting in the reference photo and identify areas that would be in shadow. Use your pencil to darken these areas, gradually building up the intensity of the shadows. By adding shadows in the right places, you can create a more realistic and three-dimensional representation of a tree frog.
| Techniques for Adding Textures and Shadows |
|---|
| – Hatching: Use parallel lines to create shading |
| – Cross-hatching: Layer sets of hatching lines at different angles for a 3D effect |
| – Recreate specific patterns and markings on the frog’s skin |
| – Pay attention to lighting and add shadows where necessary |
Remember, practice makes perfect. Don’t be afraid to experiment with different techniques and styles to find what works best for you. With time and practice, you’ll be able to create stunning drawings of tree frogs that capture their unique textures and shadows.

I’m Lena Adams—a product of an unconventional upbringing in the African wilderness. My father, a daring explorer of African wildlife, sparked my fascination with reptiles, a passion that intertwined with the tragic loss of my mother during an expedition, leaving an indelible mark on my life. Driven to understand the creatures that captivated my parents, I embarked on my journey, sharing insights about reptiles, frogs, and lizards on my website. Through my explorations and conservation efforts, I honour my family’s legacy while seeking connections—to the creatures, nature, and the mother whose presence I yearn to understand.