
If you’ve ever wondered how to draw a frog on a lily pad, you’ve come to the right place! Drawing a frog on a lily pad is not only a fun and creative activity, but it can also be a great way to improve your drawing skills. Whether you’re an experienced artist or just starting out, this step-by-step guide will show you how to bring this adorable amphibian to life on the page.
To begin, you’ll need a few basic supplies: a pencil, eraser, and paper. It’s also helpful to have a reference image of a frog on a lily pad to guide you. Once you have everything you need, find a quiet and comfortable place to start your drawing. Remember, the most important thing is to have fun and enjoy the process!
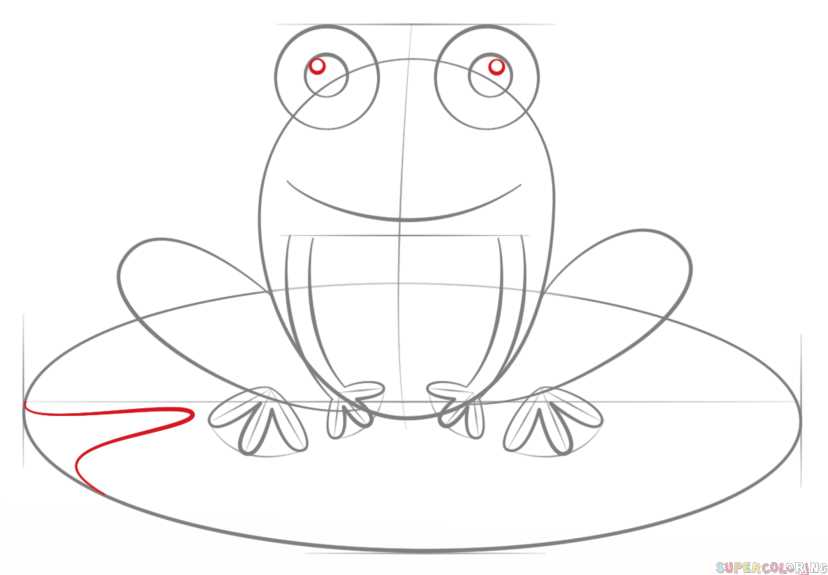
Once you’re happy with the basic shape of your frog, it’s time to add some details. Use your pencil to lightly shade in the frog’s body, leaving the belly and undersides of the feet a bit lighter. Add some gentle curves to define the frog’s limbs and toes, and use short, vertical lines to create the texture of the lily pad. Finally, add some shading to the lily pad to make it look more three-dimensional.
Gathering Materials
- Pencil: Start with a regular graphite pencil that has a fine point. This will allow you to create precise lines and details.
- Eraser: Keep a good quality eraser handy to correct any mistakes or to lighten certain areas of your drawing.
- Drawing Paper: Choose a smooth and sturdy paper that is suitable for pencil drawing. A heavier weight paper will prevent the pencil from smudging.
- Ruler: A ruler will come in handy when you need to draw straight lines or measure proportions accurately.
- Coloring Materials (optional): If you want to add color to your drawing, gather colored pencils, markers, or watercolors.
Having all these materials ready before you start will ensure a smooth drawing process and give you the freedom to focus on your artwork.
Setting Up Your Workspace
Clean and Clear
Start by clearing your workspace of any clutter or distractions. Make sure you have enough space to comfortably draw and access your materials. A clean and organized area will help you focus and concentrate on your drawing.
Choose the Right Surface
Select a smooth, sturdy surface to draw on. A drawing board or a table with a clean sheet of paper will work well. Make sure the surface is large enough to accommodate the size of your drawing, allowing for ample space around the frog and lily pad.
Proper Lighting
Good lighting is crucial for drawing. Natural daylight is ideal, so try to set up your workspace near a window. If that’s not possible, use a bright, adjustable lamp. Position the light source so that it illuminates your drawing area evenly, reducing shadows and enhancing detail visibility.
Comfortable Seating
Ensure you have a comfortable, supportive chair to sit on while drawing. Maintaining good posture will help prevent fatigue and allow you to concentrate for longer periods. Adjust the height of your chair and table, so your arms and wrists can move freely and comfortably on the drawing surface.
Gather Materials
Before you begin drawing, make sure you have all the necessary materials. This may include pencils, erasers, a ruler, colored pencils or markers for coloring, and a sketchbook or drawing paper. Having everything within reach will prevent interruptions and make the drawing process more enjoyable.
Now that your workspace is set up properly, you’re ready to start sketching the outline of your frog on the lily pad. The next step will guide you through the initial stages of your drawing, bringing your artwork to life.
Now that you have gathered your materials and set up your workspace, it’s time to start drawing! Begin by sketching the outline of the frog on the lily pad.
Start with a light pencil and make very light, loose lines. This will allow you to easily adjust and correct any mistakes as you go along. Begin by drawing a slightly elongated oval shape for the body of the frog. Add two small ovals on top of the body for the eyes.
Next, add two curved lines extending from the bottom of the body to create the back legs of the frog. Keep in mind that frogs have long, muscular hind legs, so make the lines slightly thicker and more curved towards the bottom. Repeat the same process on the other side to create the front legs.
Once you have the basic outline of the frog, you can start adding more details. Draw a curve connecting the eyes to form the top of the frog’s head. Then, add a smaller curve underneath to create the mouth. You can draw a line inside the mouth to represent the tongue if you wish.
Step 5: Adding Details to the Frog
Now that we have sketched the outline of the frog on the lily pad, it’s time to add some details to bring our drawing to life. Start by adding the eyes of the frog. Draw two small circles slightly above the halfway point of the frog’s face. These circles will represent the eyes.
Next, add the frog’s mouth. Draw a curved line that starts from one side of the frog’s face and ends in a small smile on the other side. This will give your frog a friendly and happy expression.
Now, let’s move on to the frog’s limbs. Draw two curved lines on each side of the frog’s body. These lines will represent the frog’s front and back legs. Make sure to add small oval shapes at the ends of the lines to represent the feet of the frog. The front legs should be slightly shorter than the back legs.
To add more detail, draw small curved lines within the limbs to represent the individual toes of the frog. You can also add some webbing between the toes to make it look more realistic.
Lastly, don’t forget to add the frog’s nostrils. Draw two small ovals at the tip of the frog’s snout, slightly above the mouth. These ovals will represent the frog’s nostrils.
Once you are satisfied with the details of the frog, you can move on to the next step and start drawing the lily pad.
How to Draw a Frog on a Lily Pad
Gathering Materials
Before you begin, gather all the materials you will need for this drawing. You will need a pencil, eraser, drawing paper, and colored pencils or markers.
Setting Up Your Workspace
Find a comfortable and well-lit area to set up your workspace. Make sure you have enough room to move your arm and paper freely while drawing.
Sketching the Outline
To start, lightly sketch the outline of the frog and the lily pad. Use basic shapes like circles and ovals to create the main shapes of the frog and lily pad.
Pro Tip: If you’re a beginner, it may be helpful to find a reference image of a frog to use as a guide.
Adding Details to the Frog
Once you have the basic shapes in place, start adding details to the frog. Add the eyes, mouth, nose, and legs. Pay close attention to the proportions and details of the frog to make it realistic.
Drawing the Lily Pad
After finishing the frog, move on to drawing the lily pad. Use curved lines to create the shape of the lily pad’s leaves. Add veins and texture to make it more lifelike.
Adding Water Ripples
To create the illusion of water, add ripples around the lily pad. Use curved lines and gentle strokes to indicate the movement of the water.
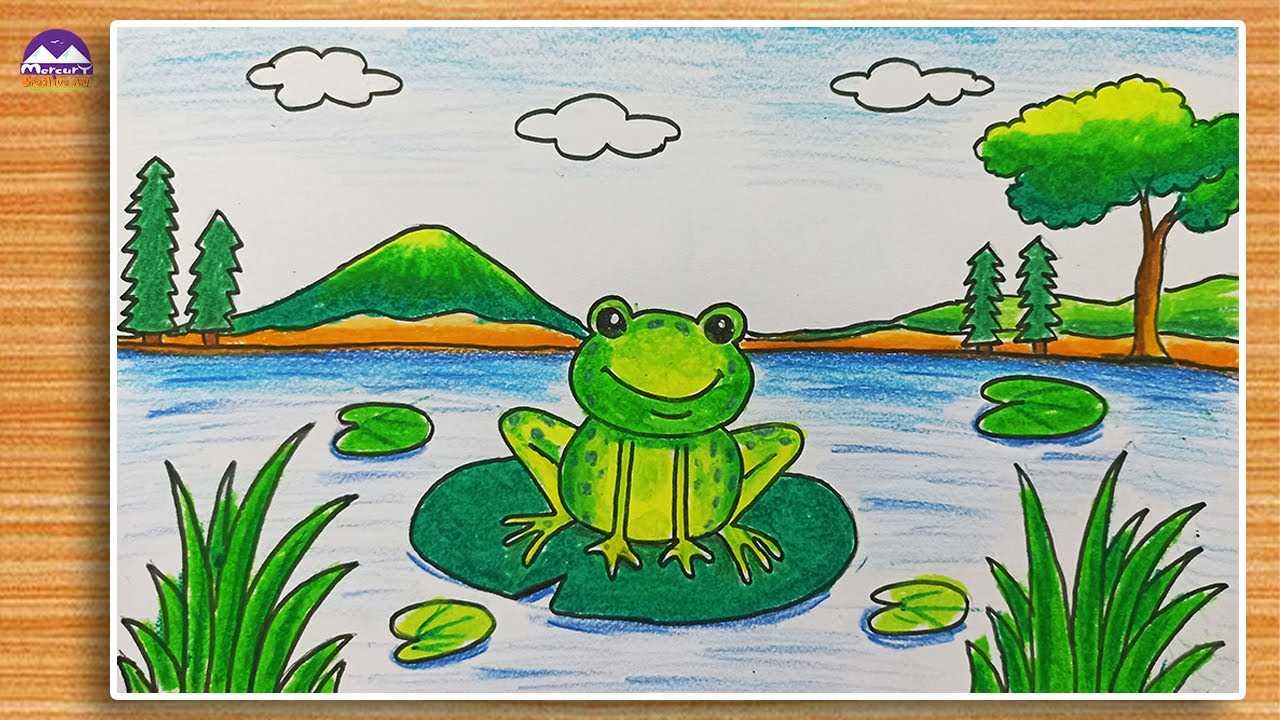
Coloring the Frog
Now it’s time to add color to your drawing. Use colored pencils or markers to bring the frog to life. Choose the colors that you think would look best for your frog.
Coloring the Lily Pad
Next, color the lily pad using shades of green and yellow. Add highlights and shadows to create depth and dimension.
Adding Shading and Highlights
To make your drawing look more realistic, add shading and highlights to the frog and the lily pad. Use darker and lighter tones to create the illusion of light and shadow.
Finalizing the Drawing
Once you are satisfied with the colors and shading, go over your drawing to clean up any smudges or mistakes. Make sure all the lines and details are crisp and clear.
Adding Background Elements
If you want to take your drawing to the next level, you can add some background elements like water lilies, dragonflies, or a pond. This will enhance the overall composition of your artwork.
Taking Care of Your Drawing Tools
After you finish your drawing, take care of your drawing tools. Clean your pencils, sharpen them if needed, and organize your workspace for future projects.
Congratulations! You have successfully learned how to draw a frog on a lily pad. Show your artwork to others and be proud of what you have created!
Showcasing Your Artwork
If you want to share your artwork with others, you can showcase it online or in a physical gallery. Share it with friends and family or enter it into art competitions to gain recognition for your talent.
Now that you have successfully drawn the outline of the frog and the lily pad, it’s time to add some water ripples to bring your drawing to life. The water ripples will create a sense of movement and add depth to your artwork. Follow these steps to create realistic water ripples:
Step 1: Find a Reference Image
To make your water ripples look realistic, it’s always helpful to have a reference image. Search for images of water ripples on the internet or in photography books. Pay attention to the patterns and shapes created by the ripples.
Step 2: Use Curved Lines
Start by lightly drawing curved lines on the surface of the water around the lily pad. These lines will represent the direction and flow of the water ripples. Vary the lengths and sizes of the lines to make the ripples look natural.
Step 3: Add Concentric Circles
Next, draw concentric circles around the lily pad to represent the waves created by the water ripples. The circles should be larger near the center and gradually get smaller towards the outer edges.
Step 4: Define the Ripples
Once you are satisfied with the placement of the lines and circles, go over them with more defined and darker lines. Use a fine-tipped pen or a sharpened graphite pencil to add more details and depth to the ripples. Pay attention to where the lines intersect and overlap, as this will create a realistic sense of water movement.
Step 5: Add Highlights and Shadows
To make the water ripples look more three-dimensional, add highlights and shadows. Using a white colored pencil or a gel pen, add highlights along the top edges of the ripples where the light hits. Then, use a darker shade of blue or gray to add shadows along the bottom edges of the ripples.
Blend the highlights and shadows gently using a blending stump or a soft brush to create a smooth transition between light and dark areas.
Remember, practice makes perfect! Don’t be discouraged if your first attempt doesn’t turn out exactly as you imagined. Keep practicing and experimenting with different techniques until you achieve the desired effect.
Now that you have sketched the outline and added details to the frog, it’s time to bring your drawing to life with some color! Coloring the frog will add depth and realism to your artwork.
Start by selecting the colors you want to use. Look closely at reference images or real frogs to observe the various shades and patterns they have. Consider using shades of green and brown for the body, with lighter tones for the belly and darker tones for the back.
Begin by filling in the frog’s body with the base color. Use gentle strokes to evenly distribute the color, paying attention to the contours and curves of the frog’s anatomy. Leave the highlights and shadows untouched for now, as you will add them later.
If your frog has any spots, stripes, or patterns, use a smaller brush or pencil to add those details. Be patient and take your time to carefully replicate the patterns observed in your reference image.
Remember to use light, feathery strokes when adding highlights and shadows to create a smooth and natural-looking transition. Blend the colors gently to avoid harsh lines and create a more realistic appearance.
Take your time and be patient as you color the frog, as this step requires attention to detail. Refer to your reference image frequently to ensure accuracy and realism.
Continue to the next step to color the lily pad.
How to Color the Lily Pad: Step-by-Step Guide
Once you have drawn the outline of the frog and the lily pad, it’s time to add some color to bring your artwork to life. Coloring the lily pad is an essential step in creating a realistic and vibrant drawing. Follow these steps to color the lily pad effectively:
1. Choose your colors: Select shades of green for the lily pad, keeping in mind that lily pads can have different hues and variations. Consider using a mix of light and dark greens to add depth and dimension to your drawing.
3. Add shading and highlights: To add dimension and texture to the lily pad, use a slightly darker shade of green to create shadows and a lighter shade to add highlights. Observe the light source in your drawing and apply these darker and lighter shades accordingly. Use light, feathery strokes to blend the colors seamlessly and create a realistic effect.
4. Create texture: Lily pads have a slightly rough and veined texture. To replicate this texture, use a sharp pencil or a thin marker to draw gentle lines or curves on the surface of the lily pad. These lines should follow the shape of the pad and create a sense of depth and detail.
5. Blend the colors: To create a smooth and blended appearance, use a blending tool, such as a blending stump or a cotton swab, to lightly blend the different shades of green together. This will help to soften any harsh lines and achieve a more realistic look.
6. Final touches: Take a step back and evaluate your work. Add any final touches or adjustments as necessary to ensure your lily pad looks realistic and visually pleasing. Pay attention to the overall balance of colors and make any necessary corrections.
By following these steps, you can successfully color the lily pad in your drawing. Remember to take your time, be patient, and enjoy the process. With practice, you will develop your own unique style and techniques for bringing your drawings to life.
Adding Shading and Highlights
Now that you have completed coloring the frog and the lily pad, it’s time to add shading and highlights to make your drawing look more realistic and three-dimensional.
To start, imagine that the light source is coming from the top left corner of your drawing. This means that the areas that are closest to the light will be lighter, while the areas that are farther away will be darker. Use a light pencil to lightly shade the areas that are facing away from the light source, such as underneath the frog and the lily pad.
Tips for shading and highlighting:
– Start with light shading and gradually build up the darkness. It’s easier to add more shade than to erase too much and lighten it.
– Pay attention to the direction of the light source and imagine how it would affect the different surfaces and textures of the frog and the lily pad.
– Look closely at reference images or real frogs and lily pads to observe how light and shadow interact on their surfaces.
– Practice shading and highlighting on a separate piece of paper before applying it to your drawing to get a better sense of how different techniques and tools work.
By adding shading and highlights, you can bring depth and dimension to your drawing, making it appear more realistic and lifelike.
Finalizing the Drawing
After adding all the necessary details and colors to your frog on the lily pad drawing, it’s time to finalize the artwork. This step involves making any final adjustments, adding shading and highlights, and ensuring that the overall composition looks balanced and visually appealing.
Start by taking a step back and looking at the drawing as a whole. Check if there are any areas that need refinement or correction. Pay attention to the proportions of the frog and the lily pad, ensuring that they are in the correct scale and perspective.
Next, focus on adding shading to create depth and volume. Look for areas of the frog and the lily pad that would naturally be darker or have shadows. Use a darker shade of the chosen colors to add these shadow areas. Gradually build up the shading, starting with light strokes and gradually increasing the pressure or darkness of the lines or colors.
Throughout the finalization process, step back and assess the drawing from different perspectives. This will help you identify any areas that need further adjustments or improvements. If necessary, make the necessary changes until you are satisfied with the overall result.
Once you are happy with the final drawing, you can consider adding background elements to enhance the composition. These elements could include plants, flowers, or other elements that would typically be found in a frog’s natural habitat. Be mindful of how these elements interact with the frog and lily pad, ensuring that they complement rather than distract from the main subject.
Finally, be sure to take care of your drawing tools after completing the artwork. Clean and store your pencils, pens, or brushes properly to ensure their longevity and maintain their quality. This will ensure that you are ready to create more amazing drawings in the future.
Showcase your finished artwork proudly! Share it with friends and family, or post it online to inspire others and showcase your talent. Remember, practice makes perfect, so keep honing your skills and experimenting with different subjects and styles.
Adding Background Elements
Once you have finished drawing the frog and the lily pad, it’s time to add some background elements to complete the scene. This will help create a sense of environment and make your drawing more visually interesting.
You can start by drawing some grass or reeds around the lily pad. Use quick, curved lines to create the texture of the plants. Make sure to vary the height and thickness of the lines to make the grass look more natural.
Next, you can add some water droplets or splashes around the lily pad to give the impression that the frog has just hopped onto it. Use small, circular shapes to represent the droplets and splashes. You can also add some lines or waves to show the movement of the water.
If you want to make the scene more realistic, you can add some other elements like rocks or flowers in the background. These can be simple shapes or more detailed depending on your preference. Remember to use lighter lines and colors for the background elements to create depth and make them appear further away.
Tips:

– Use reference images or observe nature to get inspiration for your background elements.
– Experiment with different compositions and placements of the elements to find what works best for your drawing.
With the addition of background elements, your drawing of a frog on a lily pad will come to life and tell a more complete story. Don’t be afraid to get creative and make the scene your own!
Taking Care of Your Drawing Tools
Clean and Store Properly
After each drawing session, it is crucial to clean your tools to remove any debris or smudges that may have accumulated. Use a soft cloth or tissue to gently clean the surface of your pencils and erasers. Make sure to remove any excess graphite or pencil lead from the tip by tapping it on a clean surface. Additionally, store your tools in a protective case or box to prevent damage and keep them organized.
Sharpen Regularly
For pencils, maintaining a sharp point is essential for achieving fine details in your drawings. Use a quality pencil sharpener to sharpen your pencils regularly, ensuring that the point is not too dull or too sharp. A sharp pencil allows for precise lines and shading, while a dull point may result in inaccurate or uneven marks on your drawing.
Replace Worn Tools
By taking care of your drawing tools, you can ensure that they remain in optimal condition and continue to assist you in creating stunning drawings. Regular cleaning, proper storage, and sharpening will extend the life of your tools and help you achieve the best results in your artwork.
Showcasing Your Artwork
Once you have completed your drawing of a frog on a lily pad, it’s time to showcase your artwork and share it with others. Here are some tips on how to display and present your finished piece:
1. Framing
Consider framing your drawing to give it a polished and professional look. Choose a frame that complements the colors and style of your artwork. A simple black or white frame can often work well for pencil or ink drawings.
2. Matting
If you prefer a more sophisticated presentation, you can also consider adding a mat board around your drawing. This will create a border and provide an extra layer of protection for your artwork.
3. Photography
Take high-quality photographs of your drawing to share it digitally. Use good lighting and a clean background to capture the details and colors accurately. You can then post the images on your website, social media, or online art platforms.
4. Art Exhibitions
Consider submitting your drawing to local art exhibitions or competitions. This can be a great way to gain exposure and receive feedback from professionals and fellow artists.
5. Online Portfolio
Create an online portfolio to showcase your artwork. You can build a personal website or use platforms like Behance or DeviantArt to display your drawings. Make sure to include a description and background information about your artwork.
Remember, sharing your artwork is not only about displaying your skills, but also about connecting with other artists and art enthusiasts. Embrace constructive criticism and use it as an opportunity to grow and improve as an artist. Enjoy the process and be proud of your accomplishment!

I’m Lena Adams—a product of an unconventional upbringing in the African wilderness. My father, a daring explorer of African wildlife, sparked my fascination with reptiles, a passion that intertwined with the tragic loss of my mother during an expedition, leaving an indelible mark on my life. Driven to understand the creatures that captivated my parents, I embarked on my journey, sharing insights about reptiles, frogs, and lizards on my website. Through my explorations and conservation efforts, I honour my family’s legacy while seeking connections—to the creatures, nature, and the mother whose presence I yearn to understand.