
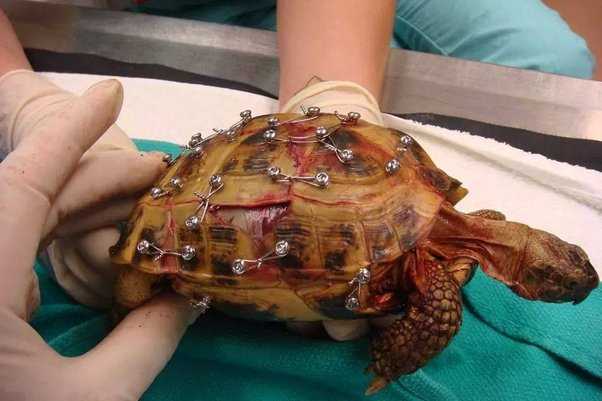
Removing a turtle shell is a highly delicate process that requires great care and precision. Any mishandling can result in severe injury or even death for the turtle. Therefore, it is crucial to follow proper techniques and guidelines to ensure the safe removal of the turtle shell.
During the shell removal process, it is essential to take necessary precautions to prevent further damage to the turtle. The turtle should be carefully restrained to minimize stress and ensure its safety throughout the procedure. Special care should be taken to avoid any injuries to the underlying soft tissues and organs that are protected by the shell.
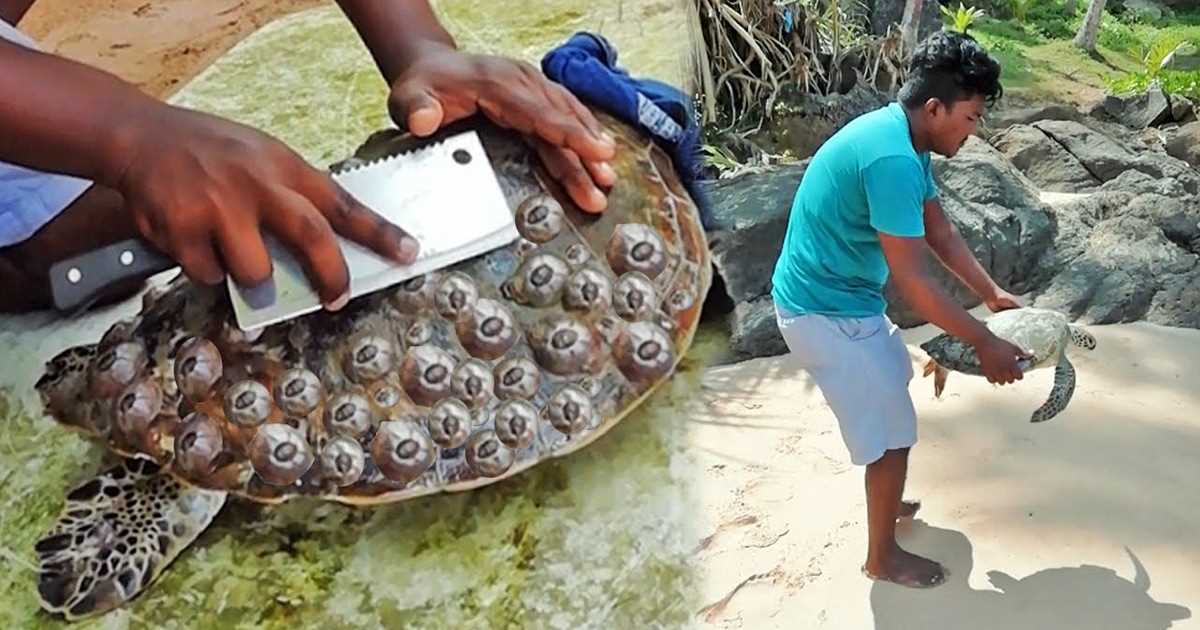
The main reason for turtle shell removal is usually due to damage or injury to the shell. The shell is made up of several layers, including the outer layer called the scutes, which are keratin-based plates that grow from the turtle’s skin. If these scutes become damaged or infected, they may need to be removed to prevent further damage or infection.
Before attempting shell removal, it is crucial to assess the severity of the damage and consult with a professional. They will be able to determine if shell removal is necessary and guide you through the appropriate steps to minimize the risk of injury to the turtle.
The procedure for turtle shell removal typically involves carefully removing the damaged or infected scutes using specialized tools such as shell scrapers or bone curettes. These tools allow for precise and controlled removal of the damaged or infected portions, while minimizing the risk of further injury to the turtle.
Why is Turtle Shell Removal Necessary?
Turtle shell removal is a delicate procedure that involves the careful removal of a turtle’s shell. This procedure is necessary in certain situations where the turtle’s shell is damaged or infected and needs to be removed to prevent further harm to the turtle.
The turtle’s shell is a unique structure that serves as its protective armor. It is made up of two parts: the carapace, which is the top part of the shell, and the plastron, which is the bottom part. The shell is made up of a series of plates called scutes, which are made of keratin, the same material that makes up our hair and nails.
Although the turtle’s shell is strong and durable, it is also fragile and can be easily damaged. The shell can be injured from falls, collisions with objects, or attacks from predators. When the shell is damaged, it can lead to infections and other complications that can be life-threatening to the turtle.
In some cases, the turtle’s shell may need to be removed completely to allow for proper treatment and healing. This can be a complex and delicate procedure that requires the expertise of a veterinarian or a professional who is experienced in turtle shell removal.
Removing a turtle’s shell is not a decision that is made lightly. It should only be done when all other options have been exhausted and the well-being of the turtle is at stake. The procedure should be performed in a sterile environment, using the proper tools and techniques to minimize the risk of further damage to the turtle.
Choosing the Right Tools for Turtle Shell Removal
Tools for Shell Removal
When choosing the tools for shell removal, it is essential to prioritize the safety and well-being of the turtle. Here are the recommended tools:
1. Non-abrasive Scalpel: A non-abrasive scalpel is crucial for making precise and clean incisions when removing the shell. It should have a sharp and sterile blade to prevent any infections.
2. Dremel Tool: A Dremel tool with a low-speed setting and a sanding drum attachment can be used to carefully grind and smooth the edges of the shell after removal. This helps prevent any sharp edges that could injure the turtle.
3. Veterinary Bandage Scissors: These scissors have a blunt tip, which reduces the risk of accidentally injuring the turtle while cutting through the connective tissues.
4. Protective Gloves: Wearing protective gloves is essential to prevent any contamination from the turtle’s shell to the person performing the removal. It also helps maintain a secure grip on the tools.
Tips for Tool Maintenance
Proper tool maintenance is crucial to ensure their effectiveness and longevity. After each use, the tools should be cleaned thoroughly to remove any debris or organic matter that may have accumulated. They should also be sterilized to prevent the transfer of any pathogens between turtles. Regular sharpening or replacing of the scalpel blades is essential to maintain their cutting abilities.
Step-by-Step Guide: How to Remove a Turtle Shell Safely
Materials Needed:
- Protective gloves
- Scalpel or fine-toothed saw
- Scissors
- Gauze or clean cloth
- Antiseptic solution or hydrogen peroxide
- Bandages or adhesive tape
Step 1: Prepare the Turtle
Before beginning the shell removal process, ensure the turtle is calm and comfortable. Place the turtle on a soft surface, such as a towel or blanket, to prevent any further injury.
Step 2: Put on Protective Gloves
Step 3: Cleaning the Shell
Clean the turtle’s shell using a mild antiseptic solution or hydrogen peroxide. Gently wipe the shell using a clean cloth or gauze to remove any dirt or debris.
Step 4: Assess the Shell Damage
Carefully examine the shell for any signs of damage or trauma. Determine the extent of the shell removal required based on the severity of the injury. Consult a veterinarian if unsure.
Step 5: Administer Anesthesia
To ensure the turtle remains still and comfortable during the shell removal process, administer a mild anesthesia. Consult a veterinarian for the appropriate anesthesia dosage and administration method.
Step 6: Remove the Damaged Shell
Using a scalpel or a fine-toothed saw, carefully cut along the edges of the damaged shell. Take caution to avoid cutting too deep to prevent any harm to the turtle’s internal organs.
Step 7: Clean the Wound

After removing the damaged shell, clean the wound thoroughly with an antiseptic solution. Gently rinse the area and remove any debris or blood using a clean cloth or gauze.
Step 8: Apply Dressings
Apply a sterile dressing or clean gauze to the wound to protect it from further injury and prevent infection. Secure the dressing in place using bandages or adhesive tape.
Step 9: Monitor the Turtle
Keep a close eye on the turtle’s progress during the recovery period. Ensure the turtle is in a warm and clean environment and provide appropriate care and nutrition to aid healing.
Step 10: Follow-up Care
Follow any instructions provided by a veterinarian for post-shell removal care. Administer any prescribed medication, change dressings regularly, and monitor the wound for signs of infection.
Remember, turtle shell removal is a complex procedure that should only be performed by trained professionals or under the supervision of a veterinarian. Seek professional help if you are unsure or inexperienced in turtle care and shell removal.
Preventing Injuries during Turtle Shell Removal
Here are some important tips to follow in order to minimize the risk of causing damage or harm during the shell removal process:
- Wear protective gloves: The turtle’s shell can have sharp edges or small protrusions that can cause cuts or punctures. Wearing thick gloves will help protect your hands from potential injuries.
- Use the right tools: Choose tools specifically designed for turtle shell removal, such as a dremel or a small saw. These tools are designed to cut through the shell without causing excessive damage.
- Take it slow and steady: Rushing the turtle shell removal process can lead to mistakes or accidents. Take your time, carefully assessing the shell’s condition, and make precise and controlled cuts.
- Avoid excessive force: The turtle’s shell is fragile, so never apply excessive force while trying to remove it. This can cause fractures or cracks that may harm the turtle.
- Be mindful of the turtle’s comfort: Throughout the shell removal process, ensure that the turtle is kept in a comfortable and secure position. This will help minimize stress and potential injuries for the turtle.
- Keep the turtle well-hydrated: Providing adequate hydration for the turtle is essential before, during, and after the shell removal procedure. This will ensure that the turtle’s body remains healthy and well-moistened, facilitating the healing process.
- Monitor for signs of distress: While performing the shell removal procedure, pay close attention to the turtle’s behavior. If the turtle shows signs of distress, such as excessive struggling or abnormal breathing, stop the procedure immediately and seek professional help.
By following these guidelines, you can help reduce the risk of injuries and potential harm during the turtle shell removal process. Remember, the well-being and safety of the turtle should always be the top priority.
Alternative Methods for Turtle Shell Removal
1. Shell Repair:
In some cases, instead of completely removing the turtle shell, repairs can be made to fix any damages. This method is especially beneficial if the shell is cracked or has minor injuries. It involves using specialized turtle shell repair kits that are available in the market. These kits contain materials like epoxy resin, fiberglass cloth, and sandpaper, which can help in repairing and reinforcing the damaged areas of the turtle shell.
2. Supportive Shell Braces:
Another alternative method is using supportive shell braces. If the turtle has a weakened or damaged shell, these braces can provide additional support to prevent further damage or injuries. Shell braces are made from non-toxic materials like medical grade silicone or thermoplastic, which are designed to be lightweight and comfortable for the turtle. These braces can be customized to fit the shape and size of the turtle’s shell, providing stability and protection.
While alternative methods can be considered, it is crucial to prioritize the well-being and health of the turtle. Removing a turtle shell is a delicate procedure that should only be performed by professionals or under the guidance of experts in turtle care. The shell is extremely fragile and any incorrect handling or removal can cause severe harm or even be fatal to the turtle.
When to Seek Professional Help for Turtle Shell Removal
If you are unsure about how to safely remove a turtle shell or if you do not have experience with this procedure, it is highly recommended to consult with a veterinarian or an experienced wildlife rehabilitator. They have the knowledge and expertise to handle such situations and can provide the necessary guidance and assistance.
Professional help should be sought if the turtle has suffered severe shell damage or if there is bleeding or signs of infection. These conditions require immediate attention and should not be treated without professional assistance.
Additionally, if the turtle is showing signs of distress or pain, such as difficulty moving or eating, it is crucial to seek professional help. They can assess the situation and determine the best course of action to alleviate the turtle’s suffering.
| Key Points: |
| – Seek professional help if unsure or inexperienced with turtle shell removal |
| – Professional assistance is necessary for severe shell damage, bleeding, or infection |
| – Distress or pain in the turtle should prompt immediate professional help |
| – Improper turtle shell removal can cause further harm and may be illegal |
Common Mistakes to Avoid during Turtle Shell Removal
Removing a turtle shell is a delicate procedure that requires careful attention and proper technique. Making mistakes during the process can result in permanent damage to the turtle and may even be fatal. It is crucial to be aware of the common mistakes to avoid when performing turtle shell removal.
1. Using excessive force
The turtle’s shell is strong, but it is also fragile. Applying excessive force while removing the shell can cause cracking or breaking, leading to severe injuries for the turtle. Always remember to handle the shell with care and avoid using excessive force.
2. Improper tools
Using the wrong tools can also cause damage to the turtle’s shell. Sharp or pointed instruments can puncture or cut through the shell, leading to serious injuries. It is essential to select appropriate tools specifically designed for turtle shell removal, such as a shell scraper or a shell separator.
3. Lack of proper training
Turtle shell removal is a specialized procedure that requires knowledge and expertise. Attempting to remove a turtle’s shell without proper training can result in irreversible harm to the turtle. It is crucial to seek guidance from a veterinarian or a trained professional who specializes in turtle care.
4. Rushing the process
Patience is key during turtle shell removal. Rushing the process increases the risk of making mistakes or causing unnecessary harm to the turtle. It is essential to take the time to properly assess the turtle’s shell, plan the removal procedure, and proceed with caution.
5. Ignoring safety precautions
6. Failing to provide proper aftercare
- Avoid using excessive force
- Use proper tools
- Seek proper training
- Take your time
- Follow safety precautions
- Provide proper aftercare
By avoiding these common mistakes, you can ensure a safe and successful turtle shell removal procedure. Always prioritize the well-being and health of the turtle, and seek professional assistance whenever necessary.
Aftercare: How to Take Care of a Turtle after Shell Removal
After the shell removal procedure, it is crucial to provide proper care and attention to the turtle to ensure its full recovery. Removing a turtle shell can be a delicate and invasive process, and the turtle’s well-being should be a top priority.
1. Keep the Turtle Isolated
After the shell removal, it is essential to keep the turtle in a separate and controlled environment. This will help minimize any stress or potential harm that can be caused by other animals or human interaction.
2. Provide a Safe and Comfortable Habitat
3. Monitor the Healing Process
4. Provide a Balanced Diet
5. Handle with Care
While the turtle is in the healing process, it is crucial to handle it with extreme care and avoid any unnecessary stress. The turtle’s shell will be fragile and vulnerable, so ensure that proper handling techniques are followed to prevent further damage.
6. Regular Veterinary Check-ups

Regular visits to a reptile veterinarian are essential during the turtle’s recovery period. The veterinarian will monitor the healing progress, perform any necessary treatments or dressings, and provide guidance on the turtle’s overall health and condition.
Legal Implications of Turtle Shell Removal
Turtles have a unique skeletal structure that is designed to provide them with protection and support. The shell is made up of two parts: the carapace and the plastron. These structures are connected to the turtle’s backbone and ribs, and removing them can cause serious damage and compromise the turtle’s survival.
In addition to the physical harm that turtle shell removal can cause, it is also important to consider the psychological impact on the animal. Turtles rely on their shells as a means of defense and removing it can lead to extreme stress and anxiety. They may become more vulnerable to predators and have difficulty adapting to their new circumstances.
Furthermore, removing a turtle’s shell for aesthetic or decorative purposes is considered unethical and inhumane. Turtles are wild animals and should be allowed to live in their natural habitat without unnecessary interference or harm.

I’m Lena Adams—a product of an unconventional upbringing in the African wilderness. My father, a daring explorer of African wildlife, sparked my fascination with reptiles, a passion that intertwined with the tragic loss of my mother during an expedition, leaving an indelible mark on my life. Driven to understand the creatures that captivated my parents, I embarked on my journey, sharing insights about reptiles, frogs, and lizards on my website. Through my explorations and conservation efforts, I honour my family’s legacy while seeking connections—to the creatures, nature, and the mother whose presence I yearn to understand.