
Once you have the basic outline and details of your frog, it’s time to add shading to create depth and dimension. Observe the lighting in your reference photo and imagine where the light is coming from. Use your pencil to create darker shades where the light doesn’t reach and lighter shades where it does. This will help give your frog a three-dimensional appearance.
With practice and patience, you can create a realistic frog drawing that captures the beauty and uniqueness of these amazing creatures. Remember to have fun and experiment with different techniques to make your drawing truly stand out!
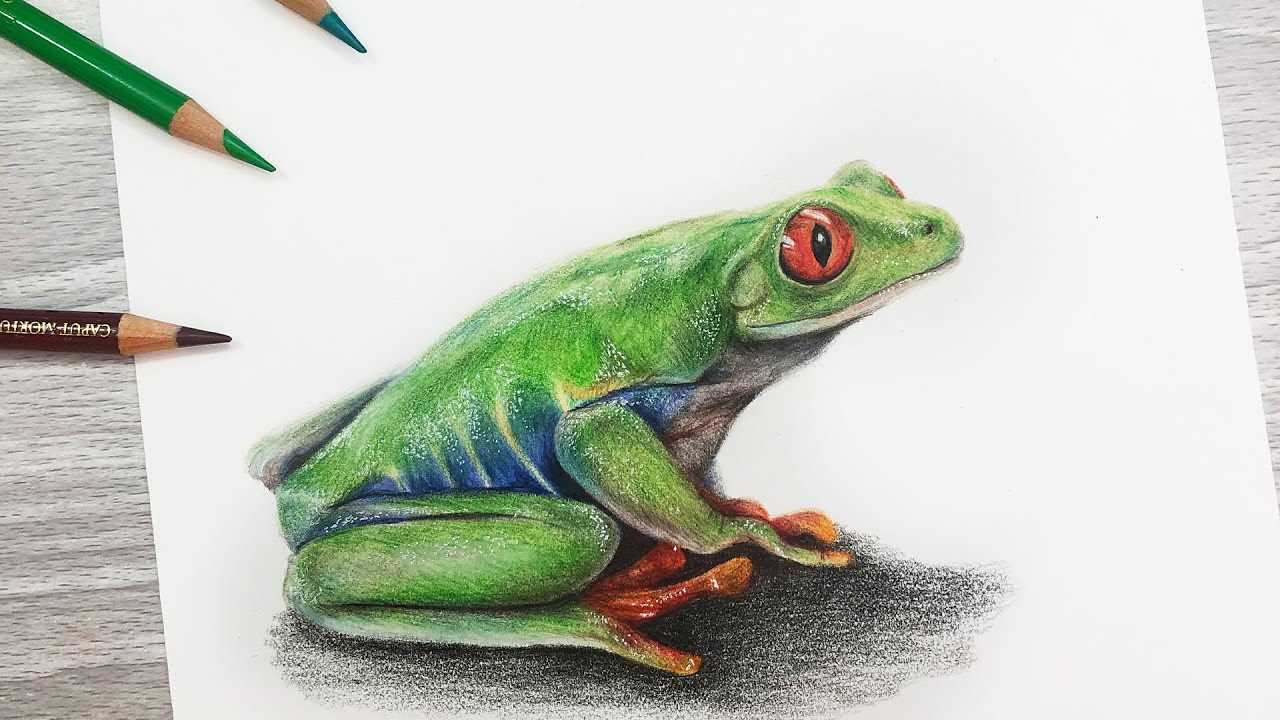
Choosing the Right Reference Image for Your Tutorial on How to Draw a Realistic Frog
Considerations for Choosing the Reference Image
- Clarity: Choose a reference image that is clear and high-resolution. This will ensure that you can see the intricate details of the frog’s features and reproduce them accurately in your drawing.
- Composition: Look for reference images that have a well-composed composition, with the frog positioned prominently and in a visually appealing manner. This will make your drawing more visually interesting and engaging.
- Lighting: Pay attention to the lighting in the reference image. Shading is crucial in creating a realistic drawing, so choose an image that has clear light and shadow patterns. This will help you understand how to render the frog’s form convincingly.
- Details: Select a reference image that showcases the specific details you want to include in your drawing. Whether it’s the texture of the frog’s skin, the pattern on its back, or the shape of its eyes, make sure the image provides ample reference for these elements.
- Step-by-Step Guide: If you’re creating a step-by-step tutorial, consider choosing a reference image that allows you to break down the drawing process into manageable steps. This will make it easier for your audience to follow along and replicate your drawing.
Gathering the necessary art supplies: A Step-By-Step Tutorial to Draw a Realistic Frog
1. Pencil: Start with a good quality pencil that allows you to have control over your lines. A graphite pencil with HB or 2B lead will work well for sketching and outlining.
2. Paper: Choose a smooth paper with a weight of at least 150gsm. The texture of the paper will affect the overall look and feel of your drawing, so opt for something that suits your desired style.
3. Eraser: An eraser is essential for removing unwanted lines and mistakes. Look for a kneaded eraser, as it can be molded into different shapes and won’t leave residue on your paper.
4. Blending tools: Blending tools such as tortillions or blending stumps will help you achieve smooth transitions and gradients in your artwork. They are especially useful when working on details and shading.
5. Reference image: Find a reference image of a frog that captures the pose and details you want to recreate. This could be a photograph, a drawing, or even a sculpture.
6. Colors: If you plan on adding color to your drawing, gather a set of colored pencils or watercolor paints. Choose colors that match the natural hues of a frog, or get creative and experiment with different color schemes.
7. Brushes: If using watercolor paints, make sure to have a set of brushes in various sizes. This will allow you to achieve different textures and details in your artwork.
By gathering these art supplies, you will be well-prepared to embark on the journey of drawing a realistic frog. Remember to take your time, observe the details, and have fun exploring your creativity!
Step 4: Sketching the Basic Outline
Now that you have gathered all the necessary art supplies, it’s time to start sketching the basic outline of your realistic frog. This step is crucial as it provides the foundation for the rest of your drawing.
Begin by lightly sketching the general shape of the frog’s body using light pencil strokes. Pay attention to the proportions and try to capture the overall form and pose of the frog. Don’t worry about adding too many details at this stage; focus on getting the basic shape right.
Remember to keep your pencil strokes light and subtle at this stage. This will make it easier to make changes later on if necessary. Use short, confident strokes to define the frog’s details, and don’t be afraid to erase and refine areas as you go along.
As you continue sketching, pay attention to the texture of the frog’s skin. Frogs have unique patterns and markings, so take your time to study and recreate these textures in your drawing. This attention to detail will add depth and realism to your artwork.
Once the basic outline and details are in place, take a step back and evaluate your work. Make any necessary adjustments to ensure accuracy and symmetry. Remember, this is just the foundation of your drawing, so don’t worry about it being perfect just yet.
Now that you have sketched the basic outline of your frog, you are ready to move on to the next step. In the following steps, you will be adding more details, focusing on the facial features, and bringing your drawing to life with colors. Stay tuned for the next part of this step-by-step tutorial.
Step 5: Adding Details to the Body
Now that you have sketched the basic outline of the frog, it’s time to add some details to make it look more realistic. This step will involve adding texture and shading to the body.
Materials Needed:
- Pencil or pen
- Eraser
- Reference image
- Blending stump or cotton swabs
To begin, carefully study your reference image and observe the patterns and textures on the frog’s body. This will help you add realistic details to your drawing.
Using your pencil or pen, start by adding small strokes or dots to mimic the texture of the frog’s skin. Pay attention to areas where the skin might appear rougher or smoother. Use reference lines and guidelines to ensure accuracy.
Next, add shading to create depth and dimension. Identify the light source in your reference image and imagine where the shadows would fall on the frog’s body. Use cross-hatching or stippling techniques to create realistic shading.
Remember to blend the shading with a blending stump or cotton swab to create smooth transitions between light and dark areas. This will help to further enhance the realism of your drawing.
As you work on this step, remember to regularly refer back to your reference image to ensure accuracy and capture the intricate details of the frog’s body.
Once you have finished adding details and shading to the body, you can proceed to the next step, which is focusing on the facial features of the frog.
Step-by-Step Tutorial on Drawing Frog Facial Features
1. Start with a Basic Outline
2. Define the Eyes
3. Add the Mouth
4. Draw the Nostrils
Frogs have visible nostrils, typically located near the top of their mouths. Draw two small ovals or circles, slightly tilted inward, to represent the nostrils. Make sure they are evenly spaced and proportionate to the size of the frog’s face.
5. Refine and Shade
Once the basic facial features are drawn, take some time to refine the details and add shading to create depth. Use light and dark pencil strokes to add shadows and highlights, giving the frog’s face more dimension.
6. Use Colors
Colors can enhance the realism of your drawing, so choose colors that closely resemble the frog’s natural coloring. Use light washes or colored pencils to add color to the frog’s skin, eyes, and mouth. Pay attention to the subtle variations in color and texture.
7. Highlight and Shade
8. Final Touches
Take a step back and assess your drawing. Make any necessary adjustments, add any final details, and ensure that the facial features are proportionate and well-defined. Erase any unnecessary guidelines or smudges, and clean up the drawing as needed.
9. Sign and Display Your Masterpiece
Once you are satisfied with your drawing, sign your name in a discreet corner. This is your unique creation, so be proud of it! Consider framing or displaying your drawing to show off your hard work and talent.
Incorporating these steps and techniques into your frog drawing will help you capture the essence of the frog’s facial features. Remember to take your time and practice, as each drawing will improve your skills and bring you closer to creating realistic and detailed frog drawings.
Step 7: Rendering the Texture and Shading
Once you have completed the outline and added the necessary details to the body and facial features of the frog, it’s time to focus on rendering the texture and shading to make the drawing appear more realistic.
Using a pencil or shading tool, gently blend the shaded areas with the rest of the drawing to create smooth transitions and avoid harsh lines. This will give the frog a three-dimensional appearance.
Next, identify the areas that are directly exposed to light and add highlights to them. This can be done by using an eraser to lift off some of the graphite or by leaving the paper blank. These highlights will make the drawing look more polished and realistic.
Continue to observe the reference image and carefully add shading and texture to the frog’s skin, paying attention to the patterns, bumps, and wrinkles. This will give the frog a lifelike texture.
Remember to use light pressure when shading and take your time to build up the layers gradually. This will allow you to create a smooth and realistic texture.
Once you are satisfied with the texture and shading, step back and evaluate your drawing. Make any necessary adjustments or additions to enhance the overall appearance.
Shading and rendering texture can be challenging, but with practice and patience, you will be able to create a realistic and lifelike drawing of a frog.
Step 8: Enhancing the Appearance with Color
Now that you have successfully sketched the basic outline and added the necessary details to the frog’s body, it’s time to enhance its appearance with color. Adding color will bring the frog to life and make it look more realistic.
Begin by selecting the appropriate colors for your frog. Look closely at your reference image to determine the shades and tones of the frog’s skin. Use a combination of greens, yellows, and browns to replicate the natural colors of a frog.
Next, focus on adding depth and dimension to the frog’s body by layering different shades of green. Start with a lighter shade and gradually darken it as you move toward the areas in shadow. Use a blending technique to seamlessly transition between the different shades.
Once you have added color to the entire frog, step back and evaluate your work. Look for any areas that may need additional shading or blending. Adjust the colors as needed to achieve a realistic and balanced appearance.
Remember, practice makes perfect, so don’t be discouraged if your first attempt doesn’t turn out exactly as you hoped. With each drawing, you will improve your skills and better understand the nuances of shading and color.
Continue to the next step, where we will focus on highlighting the highlights and shadows to further enhance the realism of our frog drawing.
Step 9: Highlighting the Highlights and Shadows
Once you have added the necessary details to your frog drawing, it is time to bring it to life by highlighting the highlights and shadows. This step is crucial in creating a realistic and three-dimensional effect.
Start by identifying the primary light source in your reference image. This will determine where the highlights and shadows should be placed. Use a lighter shade of your chosen color to add highlights to the areas that are directly hit by the light. These areas usually include the top of the frog’s head, the ridge of its back, and the tips of its limbs.
Next, use a darker shade of your chosen color to add shadows to the areas that are away from the light source. These areas typically include the underside of the frog’s body, the spaces between its limbs, and any crevices or folds in its skin. Pay attention to the way the light interacts with the different surfaces and textures of the frog’s body, and adjust the shading accordingly.
To create a smooth transition between the highlights and shadows, use a blending technique such as cross-hatching or stippling. Cross-hatching involves drawing intersecting lines, while stippling involves creating small dots. Experiment with different techniques to find the one that works best for you.
Remember to step back and assess your drawing as you go along. Compare it to your reference image to ensure that you are capturing the realistic texture and form of the frog. Take your time with this step, as it requires attention to detail and patience. Don’t be afraid to make adjustments as needed.
By highlighting the highlights and shadows, you will add depth and dimension to your frog drawing, making it appear more lifelike and realistic. This step is an essential part of the overall tutorial on how to draw a realistic frog.
| Previous Step: Step 8: Enhancing the Appearance with Color | Next Step: Step 10: Adding Final Touches and Details |
Step 10: Adding final touches and details
Start by reviewing your drawing and identifying areas that need refinement or additional details. Pay close attention to the frog’s body shape, limbs, and facial features. Use your reference image to ensure accuracy and capture the unique characteristics of the frog.
Continue to work on the shading and texture of the frog’s skin. Use different pencil techniques such as cross-hatching or stippling to create depth and dimension. Pay attention to the highlights and shadows to make your drawing more realistic.
Next, focus on enhancing the appearance of the frog with color. Select the appropriate colors for the frog’s skin and other features. Use colored pencils or paints to add color to your drawing. Layer the colors to achieve a more realistic and vibrant result.
As you add color, don’t forget to highlight the highlights and shadows. This will further enhance the three-dimensionality of your drawing. Use a lighter shade of the base color to add highlights and a darker shade to create shadows. Blend the colors smoothly for a more realistic look.
Finally, add any additional details or elements that will enhance your drawing. This can include adding texture to the background or adding a subtle reflection in the frog’s eyes. Take your time and experiment with different techniques to make the final touches truly shine.
Once you are satisfied with your realistic frog drawing, don’t forget to sign your masterpiece. This is a way to take ownership of your artwork and showcase your hard work and talent.
When displaying your drawing, consider framing it or placing it in a protective sleeve to preserve its quality. You may also want to share your artwork with others through social media or art communities to receive feedback and appreciation for your skills.
Here are some key points to remember when adding final touches and details to your realistic frog drawing:
|
Step 11: Adding Final Touches and Details
As you near the completion of your realistic frog drawing, it is essential to add the final touches and details to bring your artwork to life. This step will add depth and dimension to your drawing, making it appear more realistic and captivating.
Refine the Outline
Take a close look at your frog drawing and make any necessary adjustments to the outline. Ensure the proportions are accurate, and the shapes are well-defined. Use a fine-tip pencil or pen to carefully enhance the lines, giving your drawing a polished and refined look.
Enhance the Details
Add Highlights and Shadows
To make your frog appear more three-dimensional, add highlights and shadows to your drawing. Use a lighter tone of your chosen color for areas where the light hits the surface, and a darker shade for the areas in shadow. Blend the colors smoothly to create a realistic and seamless transition between light and dark.
Refine Shading
During this step, refine the shading on your frog’s body to create depth and volume. Observe how the light falls on the frog’s anatomy and use a soft pencil or shading tool to create smooth gradients. Pay attention to the subtle variation in tones and shadows, making your artwork more realistic and visually appealing.
Add Final Details
Now is the time to add any additional details that will further enhance your realistic frog drawing. This could include reflections in the frog’s eyes, water droplets on its skin, or even natural surroundings such as lily pads or rocks. These details will add an extra level of realism and make your artwork stand out.
Sign and Display Your Masterpiece
Congratulations! You have successfully completed a step-by-step tutorial on how to draw a realistic frog. Before signing your artwork, take a moment to appreciate your hard work and dedication. Sign your name or initials in a subtle and tasteful manner, ensuring it does not distract from the focal point of the piece. Finally, find a suitable frame or display method to showcase your masterpiece to the world!

I’m Lena Adams—a product of an unconventional upbringing in the African wilderness. My father, a daring explorer of African wildlife, sparked my fascination with reptiles, a passion that intertwined with the tragic loss of my mother during an expedition, leaving an indelible mark on my life. Driven to understand the creatures that captivated my parents, I embarked on my journey, sharing insights about reptiles, frogs, and lizards on my website. Through my explorations and conservation efforts, I honour my family’s legacy while seeking connections—to the creatures, nature, and the mother whose presence I yearn to understand.