
So, what exactly is a frog closure? A frog closure is a decorative fastening that adds a touch of elegance and sophistication to any garment. It is typically made of braided cord, and is used to secure the garment in a stylish and eye-catching way. The intricate design of a frog closure resembles the shape of a frog, hence the name. This type of closure is often used on traditional garments such as cheongsams and kimonos, but can also be applied to modern clothing to add a unique and fashionable twist.
Next, you will need to braid the fabric to create the intricate design of the frog closure. Start by folding the fabric in half lengthwise and then folding it in half again. Now, take one end of the fabric and cross it over the other end, forming a loop. Take the other end of the fabric and thread it through the loop, pulling it tight. Repeat this process until you have created the desired length of the frog closure. Once the braid is complete, secure the ends with a few stitches to prevent it from unraveling.
Now that you have created the frog closure, you can attach it to your garment. Using a needle and thread, sew the closure onto the garment, making sure to position it in a way that allows for easy opening and closing. Take your time and sew each stitch carefully, as a well-sewn closure will ensure longevity and stability. Once you have finished sewing, give your garment a final press with an iron to smooth out any wrinkles and give it a polished look.
What is a frog closure and how to make one
A frog closure is a decorative fastening often used in traditional garments such as coats, jackets, and dresses. It consists of loops and a decorative cord that interlock to securely close the garment.
Creating a frog closure can add a touch of elegance and uniqueness to your garments. It can also provide a functional and secure closure option instead of buttons or zippers.
Materials needed:
- Cord for the loops
- Decorative cord
- Needle and thread
- Scissors
- Measuring tape
- Sewing pins
Step-by-step guide:
- Measure and cut the cord: Measure and cut a length of cord for your loops, ensuring it is long enough to create the desired number of loops for your closure.
- Create the loops: Fold the cord in half and bring the ends together, creating a loop. Secure the loop by stitching the ends together. Repeat this step to create the desired number of loops.
- Attach the loops to the garment: Position the loops on the garment where you want the closure to be. Use sewing pins to temporarily secure the loops in place. Stitch each loop firmly to the fabric, making sure it is securely attached.
- Measure and cut the decorative cord: Measure and cut a length of decorative cord that is long enough to go around the loops and overlap slightly.
- Attach the decorative cord: Starting from the looped end, thread the decorative cord through each loop, interlocking them as you go. Repeat this process until the entire length of the cord is threaded through the loops, creating a visually appealing closure.
- Secure the ends: Fold the other end of the decorative cord and stitch it to form a loop, mirroring the looped end. This will secure the ends of the cord and complete the closure.
- Iron the closure: Once the closure is attached, use a garment steamer or iron to press down the loops and the decorative cord, giving them a neat and professional finish.
Following these steps will enable you to create a beautiful frog closure for your garments. It’s a great way to personalize your clothing and add a unique touch to your designs. Experiment with different types of cords and decorative elements to create variations of the closure that suit your style.
Tips for a professional finish:
- Ensure that the loops are evenly spaced and securely attached to the garment.
- Choose a decorative cord that complements the fabric and design of your garment.
- Stitch the decorative cord neatly and securely to avoid any loose ends.
- Press the closure with an iron or garment steamer to give it a polished and crisp appearance.
With practice, you’ll become more proficient in creating frog closures and can explore different designs and techniques to make your closures even more unique and eye-catching.
Now that you know how to create a frog closure, have fun adding this stylish and functional element to your garments!
Why Use a Frog Closure?
A frog closure is a decorative fastening that is often used on garments such as jackets, coats, and dresses. It consists of a loop and a button or knot, which can be made from various materials such as cord, fabric, or ribbon. Here are a few reasons why you might want to use a frog closure on your garments:
| Enhanced Style | – Frog closures can add a touch of elegance and uniqueness to your garments. They can be made in different designs and colors to complement your clothing. |
| Functional Closure | – Frog closures are not just decorative; they also serve a functional purpose. When properly made, they can securely close your garments, keeping them in place. |
| Customization | – By making your own frog closures, you have the opportunity to customize them according to your preferences. You can choose the materials, colors, and designs that match your style and the garment you are working on. |
| Unique Details | |
| Personal Satisfaction | – Making your own frog closure allows you to showcase your creativity and sewing skills. It can be a fun and rewarding project that adds a sense of pride when you see the finished result. |
Overall, using a frog closure can make your garments more stylish, functional, and personalized. Whether you’re looking to add a touch of elegance or create a unique detail, learning how to make a frog closure is a skill worth exploring.
Step 4: Attach the loops to the garment
Once you have created the loops for your frog closure, it’s time to attach them to your garment. This step is crucial as it will ensure that your closure functions properly and stays securely in place.
- Start by deciding where on your garment you want the closure to be placed. This will depend on the design of your garment and personal preference. Some common placements include the center front, the neckline, or the waistline.
- Using a needle and thread that matches the color of your garment, carefully stitch one end of each loop to the desired location. Make sure to securely fasten the loops to the fabric without causing any puckering or distortion.
- Repeat the stitching process for each loop, ensuring that they are evenly spaced and aligned properly.
- Double-check the placement and security of the loops before moving on to the next step.
Once all the loops are securely attached, you can move on to the next step to complete your frog closure.
Gather Your Materials
Before you begin measuring and cutting the cord, gather all the necessary materials. This includes the cord you will be using for the closure, a measuring tape or ruler, and sharp scissors or wire cutters.
Measure the Length of the Cord
Take the measuring tape or ruler and carefully measure the length of cord needed for your specific garment. This will depend on the size and style of the garment, as well as your personal preferences. Measure from one end of the closure to the other, ensuring that you have enough cord to create the loops and still have some left over for securing the closure.
Cut the Cord
Once you have determined the proper length of the cord, use the sharp scissors or wire cutters to cut the cord at the desired measurement point. Make sure to cut the cord cleanly and evenly to achieve a professional finish.
Check the Fit
After cutting the cord, check the fit by wrapping it around the garment and ensuring that it reaches the desired closure position. Make any necessary adjustments by trimming or re-cutting the cord as needed.
By carefully measuring and cutting the cord, you can ensure a snug and secure fit for your frog closure. Remember to double-check your measurements before making any cuts to avoid wasting materials. In the next step, you will learn how to create the loops for your closure using the cord.
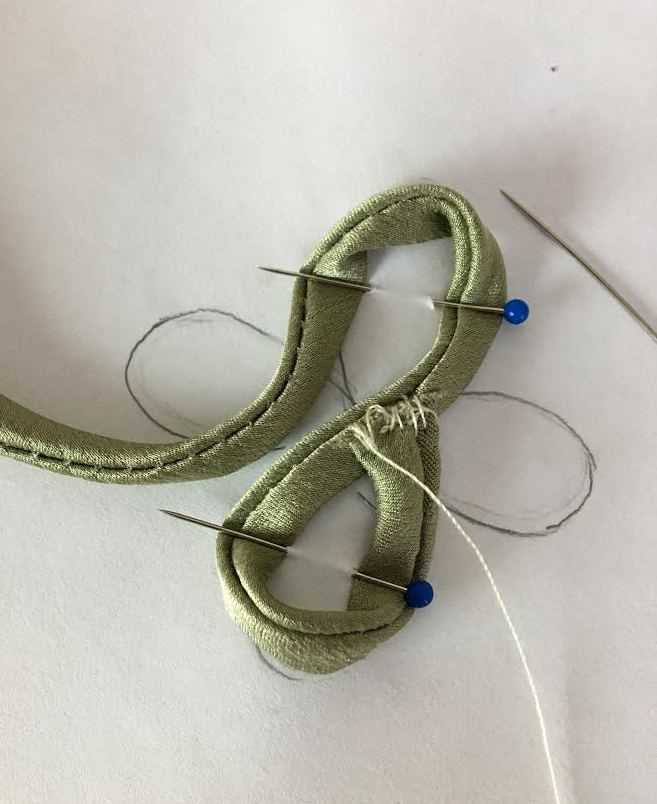
How to make a frog closure: Step 3: Create the loops
To complete your frog closure, you will need to create the loops that will hold the decorative cord in place. Follow these steps to create the loops:
- Measure and cut the cord: Start by measuring and cutting a piece of cord that is twice the desired length of your loops. This will ensure that you have enough cord to create secure loops.
- Create the center loop: Take one end of the cord and fold it in half to create a loop. The folded end should be on the left and the loose ends should be on the right.
- Create the side loops: Take the loose ends of the cord and fold them towards the left, crossing over the folded end. This will create two smaller loops on either side of the center loop. Make sure the loops are even in size and shape.
- Secure the loops: Use a few hand stitches or a sewing machine to secure the loops in place. Stitch across the top of each loop, making sure to catch all layers of the cord.
- Trim the excess: After securing the loops, trim any excess cord that is sticking out. This will give your closure a clean and finished look.
Once you have completed these steps, you will have created the loops for your frog closure. The loops will be used to hold the decorative cord in place, giving your garment a stylish and functional closure.
How to Make a Frog Closure: Step 4
Step 4 of creating a frog closure for your garments is to attach the loops to the garment. This is an important step as it ensures that your frog closure will function properly and securely hold your garment closed.
Materials Needed:
- Garment
- Cord or ribbon
- Needle
- Thread
- Pins
- Scissors
Once you have gathered your materials, you can begin attaching the loops to the garment:
- Decide on the placement of the loops on your garment. It is typically best to have one loop near the top and one near the bottom of the closure.
- Pin one end of the cord or ribbon to the garment at the desired location for the first loop.
- Using a needle and thread, sew the cord or ribbon securely to the garment. Make sure to reinforce the stitches to ensure longevity.
- Repeat steps 2 and 3 for the second loop.
Once you have attached the loops to the garment, you can move on to the next step, which is measuring and cutting the decorative cord. This cord will be used to create the actual closure and add a decorative element to your garment.
Step 8: How to Make a Frog Closure
To make a frog closure, you will need a decorative cord. This cord will add a touch of elegance to your closure and make it visually appealing. Here is a step-by-step guide on how to attach the decorative cord to your garment:
Step 8.1: Measure and cut the decorative cord to the desired length. Make sure it is long enough to wrap around the loops created in step 7.
Step 8.2: Prepare the ends of the decorative cord to prevent fraying. You can do this by applying a small amount of clear nail polish or using a fray check product.
Step 8.3: Attach one end of the decorative cord to the top loop of the frog closure. You can do this by using a needle and thread or a small piece of fabric glue.
Step 8.4: Wrap the decorative cord around the loops, making sure it is tensioned evenly. This will create a visually pleasing spiral effect.
Step 8.5: Attach the other end of the decorative cord to the bottom loop of the frog closure. Again, use a needle and thread or fabric glue to secure it in place.
By following these steps, you will successfully create a beautiful and functional frog closure for your garment. The decorative cord will add a unique touch and make the closure stand out.
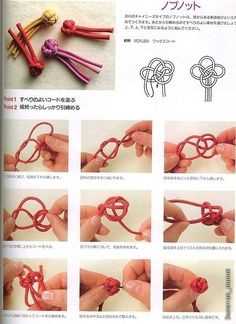
Step 9: Secure the ends
Knotting the ends
One method is to simply tie a knot at each end of the decorative cord. This will prevent it from slipping out of the loops and provide a secure closure. Make sure to tie the knots tightly and trim any excess cord for a neat finish.
Using thread and needle
Another option is to use a thread and needle to sew the ends of the decorative cord onto the garment. This will provide extra security and ensure that the closure stays in place even with repeated use. To do this, thread a needle with a matching or contrasting thread and carefully stitch the ends of the cord onto the fabric. Be sure to make tight and secure stitches, and knot the thread securely at the end.
Whichever method you choose, make sure to test the closure afterwards to ensure that it is secure and functioning properly. This will prevent any possible wardrobe malfunctions and ensure that your garment stays closed.
Now that you have prepared the decorative cord, it’s time to attach it to the loops and create a stunning frog closure for your garment. Follow these steps:
Step 7.1: Thread the decorative cord through the loops
Take the prepared decorative cord and insert one end through the loop at the top of the closure. Pull it all the way through, leaving a small tail on the other side. Repeat this process for the loop at the bottom of the closure, making sure the cord is threaded correctly.
Step 7.2: Position the decorative cord
Once the cord is threaded through both loops, position it evenly across the closure. Make sure there is enough tension in the cord to create a secure and visually appealing closure.
Step 7.3: Create the desired decorative pattern
This step is where you can get creative and create the desired decorative pattern with the decorative cord. You can experiment with different patterns, such as crisscrossing the cord or forming intricate designs. Take your time to find a pattern that complements your garment and enhances its overall look.
Step 7.4: Secure the decorative cord
Once you are satisfied with the decorative pattern, secure the ends of the decorative cord by tying them together in a knot. Make sure the knot is tight and secure, as this will prevent the cord from unraveling and coming undone.
Step 7.5: Trim the excess cord
After securing the ends of the decorative cord, trim any excess cord using sharp scissors. Be careful not to cut too close to the knot to ensure it remains secure.
That’s it! You have successfully attached the decorative cord to the loops, completing the frog closure for your garment. Take a moment to admire your work, and continue with the remaining steps to finish the closure and achieve a professional finish.
How to Make a Frog Closure: Step 8: Secure the Ends
Once you have attached the decorative cord to the loops on your garment, it’s time to secure the ends of the cord to ensure that your frog closure stays in place.
First, thread a needle with a matching thread color to your cord. Tie a knot at the end of the thread to prevent it from coming undone while you work.
Next, bring the needle and thread underneath the loops of the cord on one side, close to where the loops are attached to the garment. Pull the thread through, leaving a small loop.
Now, thread the needle back through the loop you just created, making sure to secure the end of the cord. Pull the thread tight to create a small knot. Repeat this process a couple of times to ensure that the cord is securely fastened.
Once you are satisfied with the security of the cord on one side, repeat the same process on the other side of the closure. Be sure to maintain even tension on both sides to create a balanced closure.
After securing both ends of the decorative cord, trim any excess thread to neaten up the closure. Take care not to cut the cord itself while doing this.
Finally, give the closure a gentle tug to make sure that it is securely attached and will not come undone during wear. If the closure feels loose, go back and reinforce the knots on both sides until you are confident in its stability.
By following these steps, you can ensure that your frog closure will stay in place and add a stylish finishing touch to your garments.
How to Iron a Frog Closure
Ironing your frog closure is an important final step in creating a professional finish for your garment. Here is a step-by-step guide on how to properly iron your frog closure:
- Set up your ironing board and plug in your iron.
- Adjust the heat settings on your iron according to the fabric you used for your closure. Refer to the fabric care instructions for the appropriate heat setting.
- Place a clean, thin cloth over the frog closure to protect it from direct heat.
- Preheat the iron to the desired temperature.
- Hold the iron a few inches above the closure and hover it over the cloth.
- With gentle pressure, move the iron back and forth over the closure in smooth, even strokes. Avoid pressing too hard to prevent any damage to the closure.
- Pay special attention to any creases or wrinkles, making sure to iron them out completely.
- Continue ironing the closure until it is smooth and wrinkle-free.
- Once you have finished ironing, allow the closure to cool down before handling it.
- Inspect the closure for any remaining wrinkles or imperfections. If necessary, repeat the ironing process.
- Once the closure is completely cool and free of wrinkles, remove the protective cloth.
- Your frog closure is now ready to be attached to your garment!
Remember to exercise caution when using an iron and always follow the manufacturer’s instructions for safe and proper use. Ironing your frog closure will give it a polished and professional look, ensuring that your garment is both stylish and secure.
By following these steps, you can achieve a perfectly ironed frog closure that enhances the overall appearance of your garment.
Tips for a professional finish
1. Choose the right materials
Using high-quality materials is essential for creating a professional-looking frog closure. Opt for sturdy cords that will withstand frequent use and ensure that the decorative cord complements the fabric and design of your garment.
2. Take precise measurements
Accurate measurements are crucial when creating a frog closure. Measure the length of the cord and the loops precisely to ensure a proper fit and functionality. Taking your time with this step will result in a well-fitting closure.
3. Secure the loops firmly
When attaching the loops to the garment, make sure to secure them firmly. Use small stitches or even reinforce with a few hand-sewn knots to ensure that the loops will not come undone during wear or washing.
4. Pay attention to symmetry and alignment
5. Use a matching thread
When sewing the loops and decorative cord, choose a thread color that matches the garment. This will create a seamless look and help to camouflage the stitches, resulting in a more polished finish.
6. Finish the ends neatly
Take care to neatly finish the ends of the cords and decorative cord. You can use fraying glue or fabric adhesive to prevent fraying. Alternatively, you can fold the ends over slightly and secure them with a few hand stitches for a cleaner and more professional look.
By following these tips, you can ensure that your frog closure looks professional and adds a stylish touch to your garments. Remember to practice and refine your technique to achieve the best results.
Tips for a professional finish
When creating a frog closure for your garments, these tips will help you achieve a professional finish:
1. Choose high-quality materials
To ensure a durable and visually appealing closure, use high-quality cords and decorative materials. This will not only make the closure more functional but also enhance the overall aesthetic of your garment.
2. Take your time with measurements
3. Use a sturdy thread
When attaching the loops and decorative cord to the garment, use a strong and durable thread. This will ensure that the closure stays intact even with frequent use or during laundering. It is recommended to use a thread that matches the color of your garment for a seamless look.
4. Secure the ends properly
When finishing the ends of the cords, make sure to secure them tightly. You can use clear nail polish or a touch of fabric glue to prevent fraying. This will give your frog closure a neat and professional look.
5. Iron the closure
Once the closure is complete, gently iron it on a low heat setting. This will help smooth out any wrinkles or creases and give the closure a crisp and polished appearance. Be careful not to apply too much heat to avoid damaging the materials.
6. Practice different variations
Don’t be afraid to experiment with different variations of frog closures. Try using different colors and textures of cords, or incorporate beads and other embellishments. This will give your garment a unique and personalized touch.
Follow these tips to create a frog closure that not only functions well but also adds a stylish and professional look to your garments. With practice, you will be able to master the art of creating beautiful and functional closures for all your sewing projects.

I’m Lena Adams—a product of an unconventional upbringing in the African wilderness. My father, a daring explorer of African wildlife, sparked my fascination with reptiles, a passion that intertwined with the tragic loss of my mother during an expedition, leaving an indelible mark on my life. Driven to understand the creatures that captivated my parents, I embarked on my journey, sharing insights about reptiles, frogs, and lizards on my website. Through my explorations and conservation efforts, I honour my family’s legacy while seeking connections—to the creatures, nature, and the mother whose presence I yearn to understand.